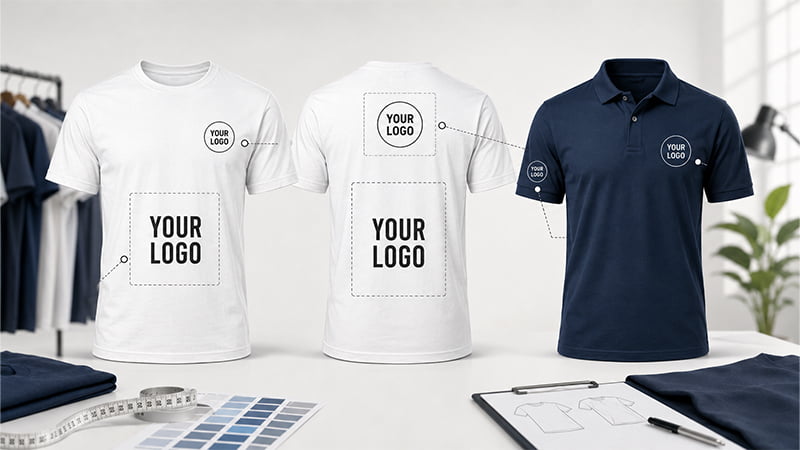
A logo can look centered in a design file but still sit too high, too low or too close to a seam on the finished garment. This T-shirt logo placement guide covers practical starting points for left chest, front, back, sleeve and polo designs, plus the key checks needed before approving custom apparel for bulk production.
Use these measurements as starting references. Confirm final placement on the selected garment, size range and decoration method before production.
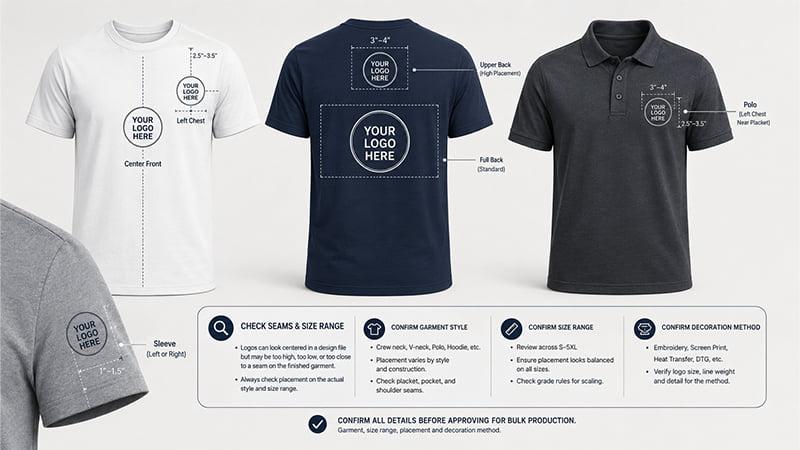
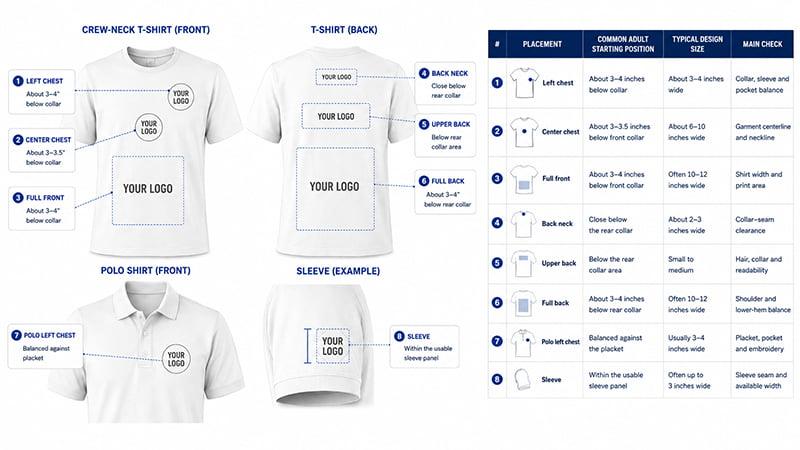
Quick T-Shirt Logo Placement Chart
The following measurements are common starting points for standard adult garments. Final placement should be checked on the selected shirt style before sampling.
| Placement | Common Adult Starting Position | Typical Design Size | Main Check |
|---|---|---|---|
| Left chest | About 3–4 inches below the collar area | About 3–4 inches wide | Collar, sleeve and pocket balance |
| Center chest | About 3–3.5 inches below the front collar | About 6–10 inches wide | Garment centerline and neckline |
| Full front | About 3–4 inches below the front collar | Often 10–12 inches wide | Shirt width and print area |
| Back neck | Close below the rear collar | About 2–3 inches wide | Collar-seam clearance |
| Upper back | Below the rear collar area | Small to medium | Hair, collar and readability |
| Full back | About 3–4 inches below the rear collar | Often 10–12 inches wide | Shoulder and lower-hem balance |
| Polo left chest | Balanced against the placket | Usually 3–4 inches wide | Placket, pocket and embroidery |
| Sleeve | Within the usable sleeve panel | Often up to 3 inches wide | Sleeve seam and available width |
Use this chart as a starting point for T-shirt design placement, then confirm the dimensions on the actual garment. Record both the measurement anchor and whether the distance refers to the top or center of the design.
Before You Use the Placement Measurements
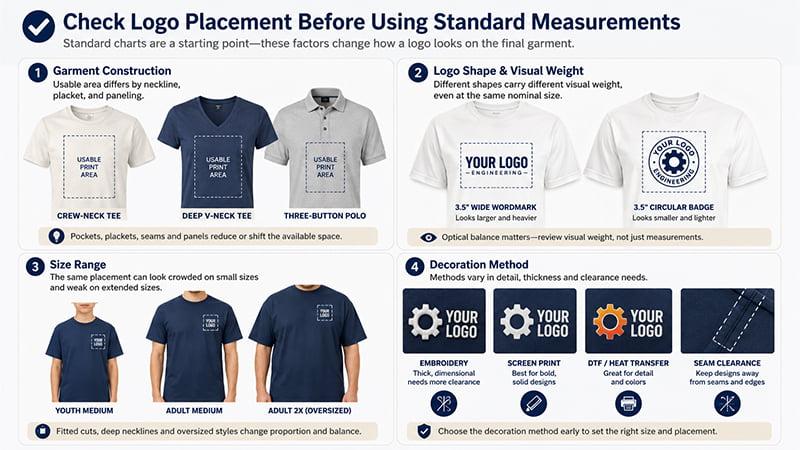
A standard chart only works when it is applied to the correct garment and artwork.
Garment construction. A crew-neck T-shirt, deep V-neck shirt and three-button polo do not offer the same usable chest area. Pockets, plackets, reinforced seams and shaped panels can change both the visual center and the flat area available for decoration. Check the actual product rather than relying only on a generic mockup. The TOMAS Crafts guide to shirt neck types explains how different necklines affect the available design space.
Logo shape and visual weight. A 3.5-inch horizontal wordmark can look much larger than a 3.5-inch circular badge. A tall emblem may also appear lower than a wide design, even when both artwork boxes are mathematically centered. TOMAS Crafts therefore reviews visual weight as well as physical dimensions.
Size range. A placement approved on an adult medium may look crowded on a youth shirt and visually weak on an extended adult size. Fitted cuts, deep necklines and oversized shirts also change the relationship between the design, collar and body.
Decoration method. Screen printing, DTF, DTG, heat transfer and embroidery require different flat areas, detail levels and seam clearance. Choose the decoration method before approving the final design size and position.
Front T-Shirt Logo Placement
Left Chest Logo Placement
Left chest logo placement is one of the most common choices for staff uniforms, branded workwear, corporate apparel and event teams. It creates visible brand identity without covering the entire front of the shirt.
A small left chest print often starts at about 3–4 inches wide. Compact badge-shaped designs may work at the lower end of that range, while a horizontal wordmark may need a different width or optical position.
The logo should feel balanced between the collar, shoulder and sleeve. Measuring only from the armhole can create problems because the armhole moves outward as the garment becomes wider. On an oversized or extended-size shirt, this method may push the logo too far toward the wearer’s side.
For a more reliable left chest placement, record both:
- the finished logo dimensions;
- the position of the logo on the selected garment.
The same artwork may require a different width or location when it moves from a standard T-shirt to a polo, hoodie or fitted shirt.
For embroidery, simplify very small text and fine outlines before sampling. A digital file cannot confirm whether every detail will remain clear after the artwork is converted into stitches.
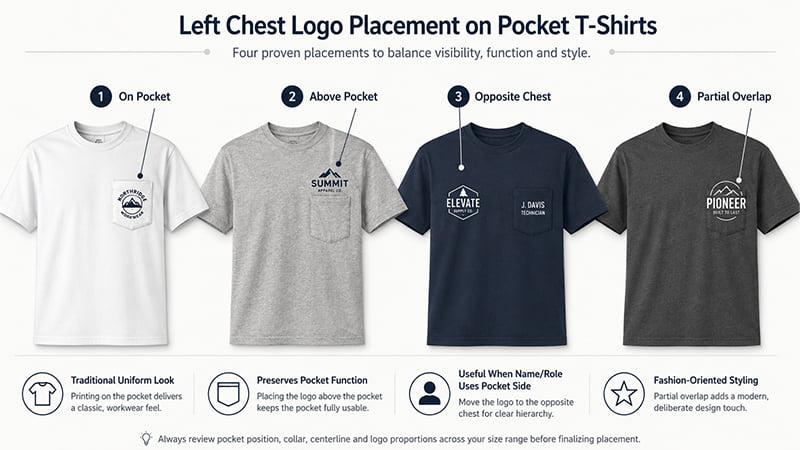
Left Chest Placement on Pocket T-Shirts
A pocketed shirt creates several possible locations:
- directly on the pocket;
- above the pocket;
- on the opposite chest;
- partly overlapping the pocket for a deliberate fashion effect.
Printing or embroidering directly on the pocket can create a traditional uniform look, but it may reduce pocket flexibility or usable space. Positioning the logo above the pocket preserves more function, although the available design height may be limited.
The opposite chest can work when a name, role or badge already occupies the pocket side.
Do not use the pocket top as the only measurement anchor until you confirm whether its position changes across the size range. Review the pocket, collar, garment centerline and logo proportions together.
Center Chest Placement
A center chest placement provides more visibility than a left chest print while remaining smaller than a full front graphic, making it suitable for short brand names, simple icons, campaign messages and event identification.
A common adult starting width is about 6–10 inches. Position the design below the neckline and align it with the garment’s vertical centerline.
Visual centering matters as much as mathematical centering. An asymmetrical logo may need a slight optical adjustment even when its artwork box is technically centered.
Deep V-neck shirts often require a lower starting point than crew-neck shirts. The same center chest artwork can look crowded if it sits too close to a lower neckline.
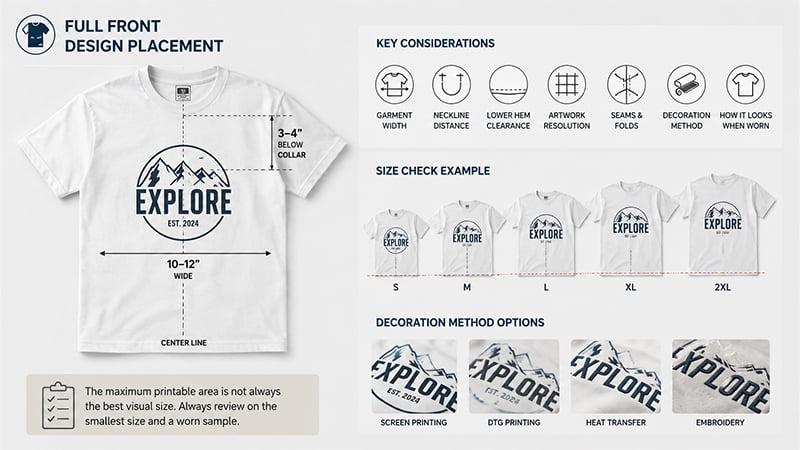
Full Front Design Placement
A full front design suits event shirts, promotional campaigns, sports teams, retail merchandise and large brand graphics.
Adult designs often begin around 10–12 inches wide, although some garments and production systems allow a larger printable area. The maximum technical area is not always the best visual size.
A design can fit within the available print zone and still feel too large when worn. Large solid ink areas may also change the fabric hand and reduce comfort.
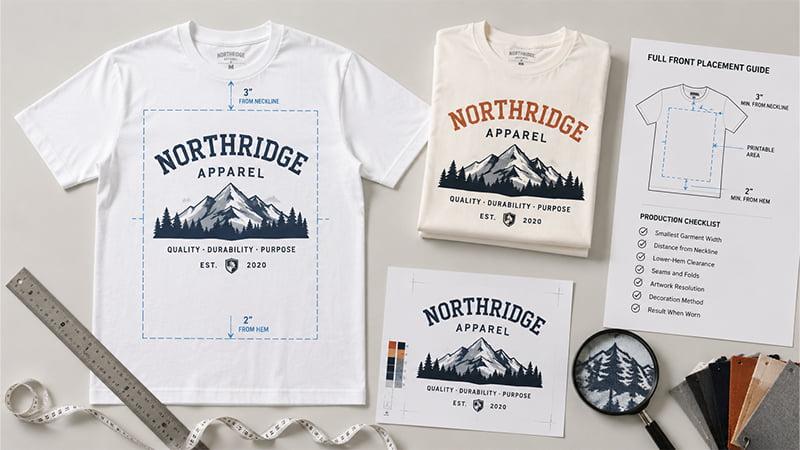
Before approving a full front design, check:
- the smallest garment width;
- the distance from the neckline;
- lower-hem clearance;
- artwork resolution;
- seams and folds;
- the selected decoration method;
- the result when the shirt is worn.
For fabrics with meaningful shrinkage risk or retail programs with strict appearance requirements, wash a decorated sample and review the relationship between the print, collar and hem. Formal garment dimensional-change evaluations may refer to a recognized method such as AATCC TM150.
Back of Shirt Design Placement
The back offers more uninterrupted space than the front, but each design still needs a defined purpose. A small back-neck mark, upper-back staff identifier and full-back event graphic should not use the same placement rules.
Back-Neck and Upper-Back Logos
A back-neck logo is usually a small secondary mark positioned close below the rear collar. It works well for subtle retail branding or a supporting logo that should not compete with the main design.
Upper-back placement sits lower and can carry:
- a company or team name;
- a staff role;
- short event text;
- a secondary sponsor mark.
Keep the design clear of the collar seam and consider how long hair, a raised collar, hood or jacket may cover it.
Text such as “STAFF,” “CREW” or “SECURITY” provides functional information. It should remain readable from a practical distance and should not be treated like a small decorative neck mark.
Full-Back Design Placement
A full back print is suitable for event names, team graphics, tour dates, sponsor lists and campaign messages.
A common adult starting point is about 3–4 inches below the rear collar, with many designs measuring around 10–12 inches wide. The final back of shirt design placement depends on the artwork proportions.
A tall sponsor list may need to start higher than a wide illustration. A deep graphic also needs enough clearance above the lower hem.
Review the design while the shirt is worn, not only while it is laid flat. Shoulder width, body length and fabric drape can change its apparent position.
Multi-Location Layouts for Staff, Events and Sponsors
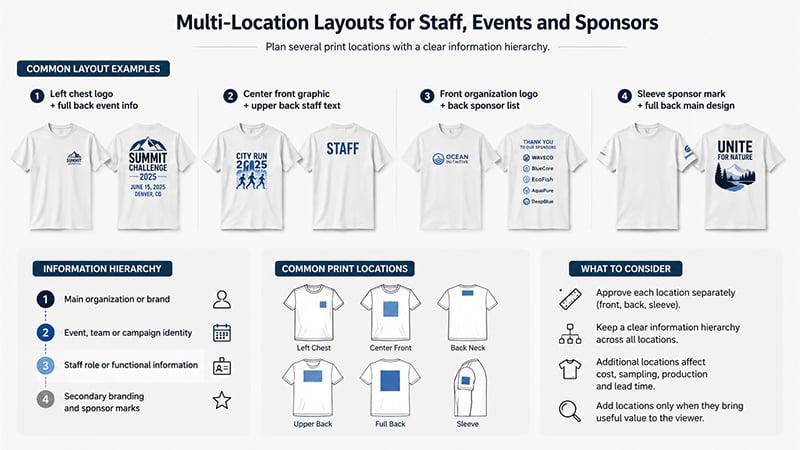
Many custom T-shirts use more than one print location. Common combinations include:
- left chest brand logo with full-back event information;
- center-front graphic with upper-back staff text;
- front organization logo with a back sponsor list;
- sleeve sponsor mark with a full-back main design.
For custom T-shirts with front, back and sleeve artwork, every location should be approved separately.
A practical information hierarchy is:
- main organization or brand;
- event, team or campaign identity;
- staff role or functional information;
- secondary branding and sponsor marks.
Consistency does not mean making every logo the same size. It means maintaining a clear hierarchy across the front, back and sleeves.
Each additional print location normally requires separate positioning, production handling and quality checks. Adding front, back or sleeve artwork may affect:
- setup costs;
- sample approval;
- production handling and lead time;
- quality inspection.
Before adding another location, confirm whether it gives the viewer useful information or only increases cost and production complexity.
Logo Placement on Polo Shirts
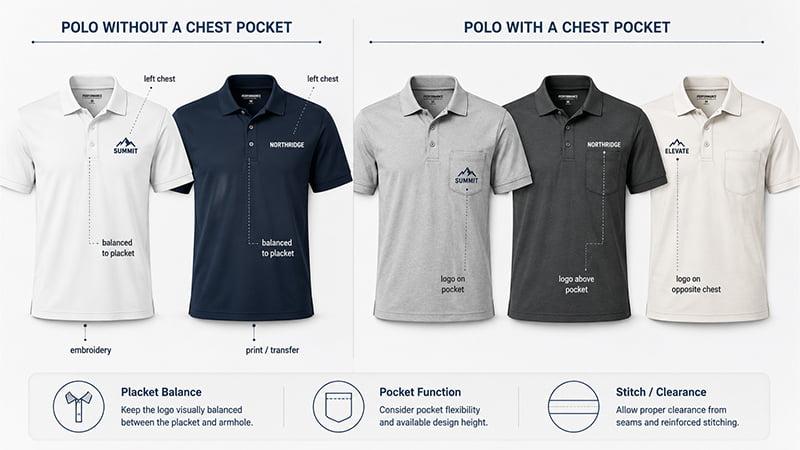
Logo placement on polo shirts requires separate decisions because the placket, buttons and possible chest pocket change the usable front area.
Polo Without a Chest Pocket
A small left chest logo is the most common choice for corporate uniforms, hospitality staff, sales teams and branded golf apparel.
The design should feel balanced between the placket and armhole. A wide wordmark may need to be reduced or repositioned so it does not appear crowded against either structure.
Embroidery is common on polo shirts, but screen printing and transfer methods may also work when the fabric and artwork are suitable. The selected method affects how close the design can sit to reinforced stitching.
Do not copy a crew-neck T-shirt placement without checking the actual polo style.
Polo With a Chest Pocket
For a pocketed polo, the logo may be:
- embroidered on the pocket;
- positioned above the pocket;
- placed on the opposite chest.
A pocket logo creates a traditional uniform appearance but can affect pocket flexibility. Placement above the pocket may preserve function while limiting the available design height.
The opposite chest can work when a name, title or badge already occupies the pocket side. Review the pocket and placket together, then decide whether the pocket or the logo will act as the main visual reference.
Placket, Pocket and Embroidery Constraints
Buttons, reinforced stitching and pocket edges create raised areas that can interfere with screen-printing pressure, heat-press contact or embroidery hoop access.
The logo needs enough clearance for the selected production setup. There is no universal two-inch buffer that works for every polo. The suitable distance depends on:
- placket width;
- logo dimensions;
- garment size;
- decoration method;
- pocket position;
- available equipment and fixtures.
Fine lettering and thin outlines also need special attention. Dense embroidery on lightweight performance fabric can cause puckering or distort the shirt.
TOMAS Crafts reviews polo placement against the actual placket, pocket and armhole rather than applying one collar-drop measurement to every style. More construction options are explained in the guide to types of polo shirts.
Sleeve and Other Secondary Logo Placements
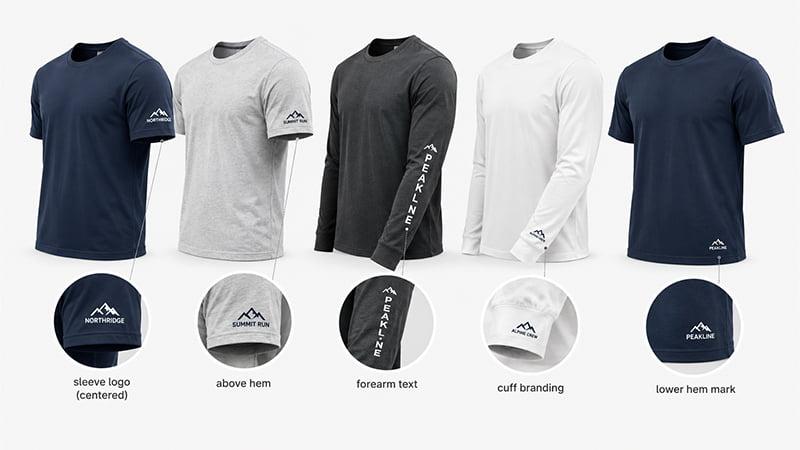
Sleeve placement. Sleeves work well for sponsor logos, flags, department names and small secondary branding. A short-sleeve mark is often centered within the usable panel or positioned above the sleeve hem. Many designs remain within about 3 inches wide, although the real limit depends on sleeve width and construction.
Long sleeves can support vertical text, forearm graphics, cuff branding or repeated small icons. Confirm the reading direction before production because text that looks correct on a flat sleeve may face the wrong way when the arm hangs naturally. Sleeve seams and curved surfaces also reduce the usable space.
Hem and small branding areas. A lower-hem mark can provide subtle brand identity without competing with the main chest or back design. These locations work best for short wordmarks, simple icons and small retail details.
Creative placement should still support the purpose of the shirt. A secondary mark adds little value if it creates another production operation but remains almost invisible when worn.
How Placement Changes Across Shirt Sizes and Fits
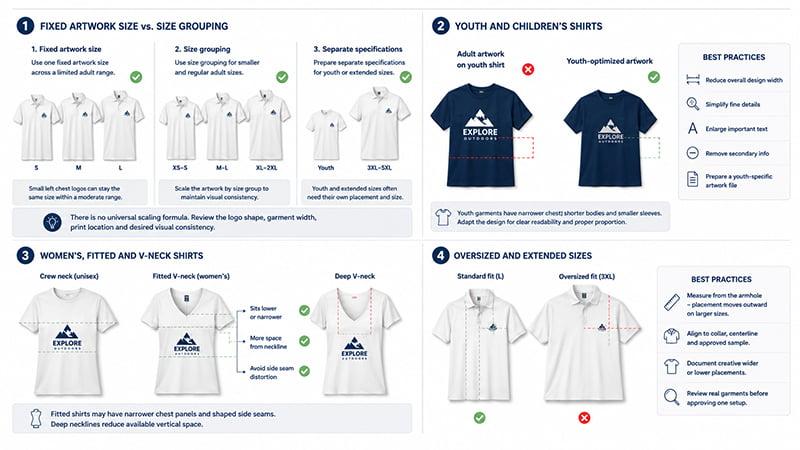
Fixed Artwork Size vs. Size Grouping
There are three common ways to handle a size run:
- use one fixed artwork size across a limited adult range;
- use size grouping for smaller and regular adult sizes;
- prepare separate specifications for youth or extended sizes.
A fixed left chest logo can often work across a moderate adult range because the branding is intentionally small. A large full front graphic is more likely to need size grouping because it occupies a larger proportion of the garment.
There is no universal scaling formula. Review the logo shape, garment width, print location and desired visual consistency.
Youth and Children’s Shirts
Youth garments have narrower chest panels, shorter bodies and smaller sleeves. Reducing an adult file proportionally may make the text too small or the artwork too detailed.
A better solution may involve:
- reducing the overall design width;
- simplifying fine details;
- enlarging important text;
- removing secondary information;
- preparing a youth-specific artwork file.
Women’s, Fitted and V-Neck Shirts
Fitted shirts may have narrower chest panels and shaped side seams. Deep necklines also reduce the available vertical space.
A center chest graphic that works on a unisex crew neck may need to sit lower or become narrower on a fitted V-neck.
The actual garment model matters more than the size label alone. Two shirts marked “Medium” may have different chest widths, shoulder shapes and neckline depths.
Oversized and Extended Sizes
On larger garments, measuring from the armhole can move a left chest logo too far outward. Use a reference related to the collar, garment centerline and approved sample.
Oversized fashion shirts may intentionally use lower or wider placement. That decision should be documented rather than left to the production operator.
For wide size ranges, review representative garments before approving one setup for the full order. Always compare the artwork against the actual shirt size, not only the size name shown in the order list.
How Decoration Methods Affect Placement
The decoration method changes the usable area. This section focuses on its effect on placement; the wider differences are covered in the TOMAS Crafts guide to T-shirt printing methods.
Screen Printing, DTF, DTG and Heat Transfer
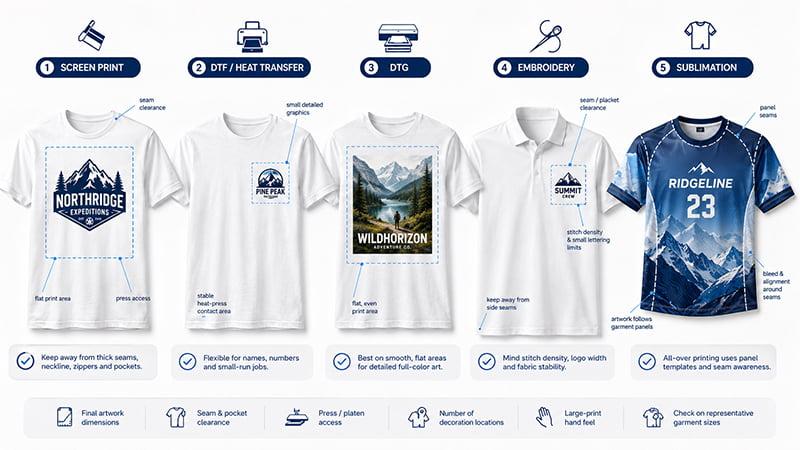
Screen printing normally needs a relatively flat working area and clear separation from thick seams, zippers, pockets and plackets.
DTF and heat transfer provide flexibility for detailed graphics, names and smaller production runs, but the heat press still needs stable contact with the fabric. DTG can support detailed full-color artwork on suitable garments, although the usable print zone changes by product and production setup.
For each method, confirm:
- final artwork dimensions;
- seam and pocket clearance;
- press or platen access;
- number of decoration locations;
- large-print hand feel;
- representative garment sizes.
Embroidery
Embroidery is commonly used for left chest logos, polo shirts, uniforms and premium branded apparel.
Key placement issues include small lettering, thin lines, stitch density, logo width, backing and fabric stability. When the artwork contains dense stitching or the shirt uses lightweight fabric, approve an actual embroidered sample rather than relying only on a digital mockup.
Sublimation and All-Over Printing
All-over sublimation follows garment panels rather than a standard chest rectangle. Artwork may require size-specific templates, bleed and checking around seams.
Perfect continuity across every seam should not be assumed because small shifts can occur during cutting and sewing.
Bleed is mainly relevant to all-over and panel-based printing. Standard chest and back prints normally require finished artwork dimensions and seam clearance rather than full-page bleed.
A Real TOMAS Multi-Garment Branding Enquiry
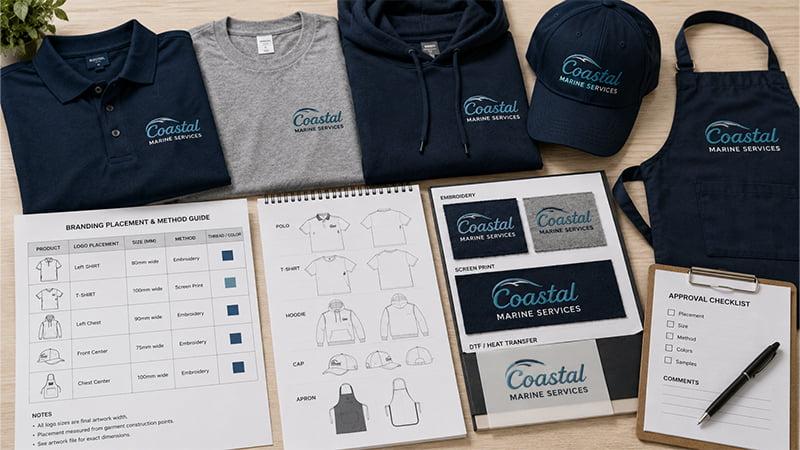
An Australian uniform buyer contacted TOMAS Crafts about a coordinated range that included polo shirts, T-shirts, hoodies, caps and aprons. The customer was interested in combed-cotton polos, low minimum order quantities and several branding options, including embroidery, screen printing, DTG and DTF.
The Placement Challenge
The same logo file could not simply be applied at identical dimensions across every product.
A left chest logo that looked balanced on a polo could be:
- too wide for an apron bib;
- too small on a hoodie;
- unsuitable for the available cap embroidery area;
- incorrectly positioned beside a pocket or placket.
Each product also needed a different measurement anchor. A polo uses its placket and chest structure, while a cap depends on its front panel and an apron may use the bib or pocket.
TOMAS Crafts’ Recommended Approval Approach
For this type of enquiry, TOMAS Crafts recommends treating the products as one branding program while preparing a separate placement specification for each garment family.
Polo shirts and caps require embroidery-detail checks. T-shirts and hoodies may use screen printing, DTG or DTF according to the artwork, fabric, quantity and required locations.
This enquiry shows why one artwork file cannot serve as one universal placement specification. Different garment families need separate placement rules, while brand consistency should come from visual hierarchy rather than identical logo dimensions.
TOMAS Bulk Placement Approval Workflow
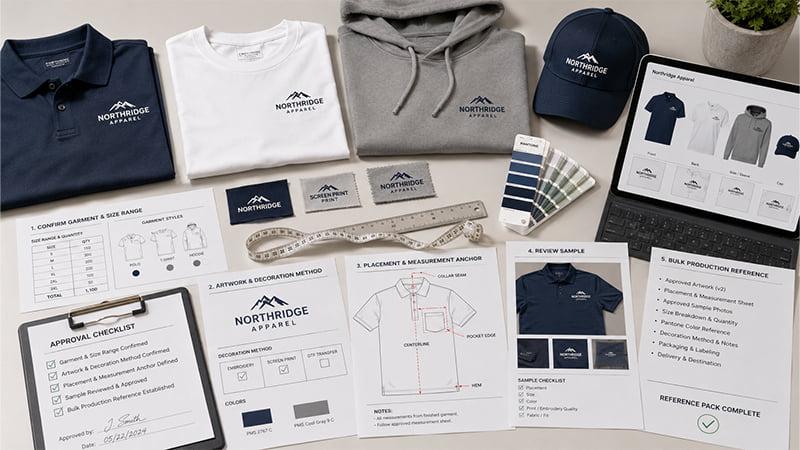
A clear approval process reduces avoidable confusion between artwork preparation, sampling and bulk production.
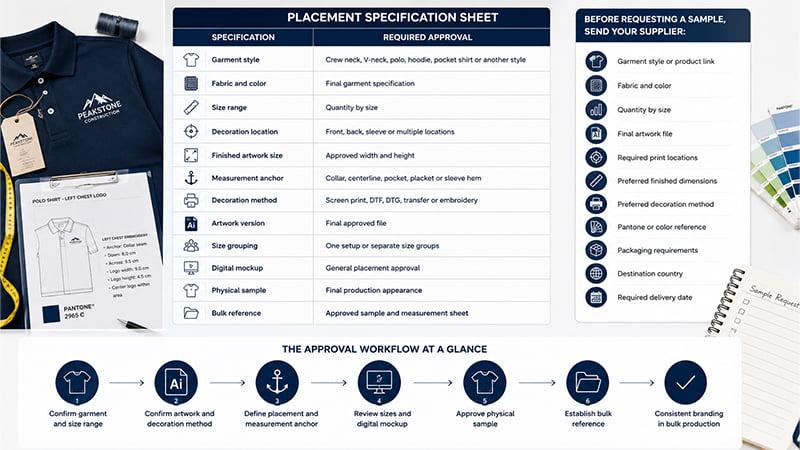
Step 1: Confirm the garment and size range. Record the garment model, neckline, pocket or placket, fabric, color and quantity by size. Do not approve placement using a blank mockup that differs from the final garment.
Step 2: Confirm the artwork and decoration method. Confirm the final artwork version, vector or high-resolution file, finished width and height, approved colors and selected production method.
Before sending an Illustrator file, convert text to outlines to reduce missing-font or font-substitution problems. Keep a separate editable copy of the artwork.
When color consistency matters, include an applicable Pantone color reference instead of relying only on how a color appears on a monitor.
Create a simplified small-area artwork version when the original contains details that may not reproduce clearly at the required size.
Step 3: Define the placement and measurement anchor. State exactly where the design will sit and which reference point will be used. Possible anchors include the collar seam, garment centerline, pocket edge, placket, sleeve hem or another approved template point.
Approve the artwork content and placement instructions as separate production documents. One defines what will be decorated; the other defines where it will be placed and at what finished size.
Step 4: Review sizes and approve the sample. A digital mockup can confirm the artwork version, general position, scale, color direction and relationship between front, back and sleeve branding.
A physical pre-production sample can confirm the actual garment position, collar and pocket balance, fabric behavior, print feel, embroidery clarity and worn appearance. For garments with shrinkage risk or strict retail requirements, a decorated wash sample can also help confirm the post-wash result.
Step 5: Establish the bulk-production reference. The production reference should include the approved artwork, placement measurement sheet, approved sample, reference photographs and instructions for applicable size groups.
These records do not promise zero variation, but they reduce differences caused by unclear instructions or inconsistent measurement points.
TOMAS Placement Specification Sheet
| Specification | Required Approval |
|---|---|
| Garment style | Crew neck, V-neck, polo, hoodie, pocket shirt or another style |
| Fabric and color | Final garment specification |
| Size range | Quantity by size |
| Decoration location | Front, back, sleeve or multiple locations |
| Finished artwork size | Approved width and height |
| Measurement anchor | Collar, centerline, pocket, placket or sleeve hem |
| Decoration method | Screen print, DTF, DTG, transfer or embroidery |
| Artwork version | Final approved file |
| Size grouping | One setup or separate size groups |
| Digital mockup | General placement approval |
| Physical sample | Final production appearance |
| Bulk reference | Approved sample and measurement sheet |
Before requesting a sample, send your supplier:
- garment style or product link;
- fabric and color;
- quantity by size;
- final artwork file;
- required print locations;
- preferred finished dimensions;
- preferred decoration method;
- Pantone or color reference;
- packaging requirements;
- destination country;
- required delivery date.
Explore TOMAS Crafts’ custom apparel options for uniforms, events, promotions and coordinated branding programs.
Common T-Shirt Logo Placement Mistakes
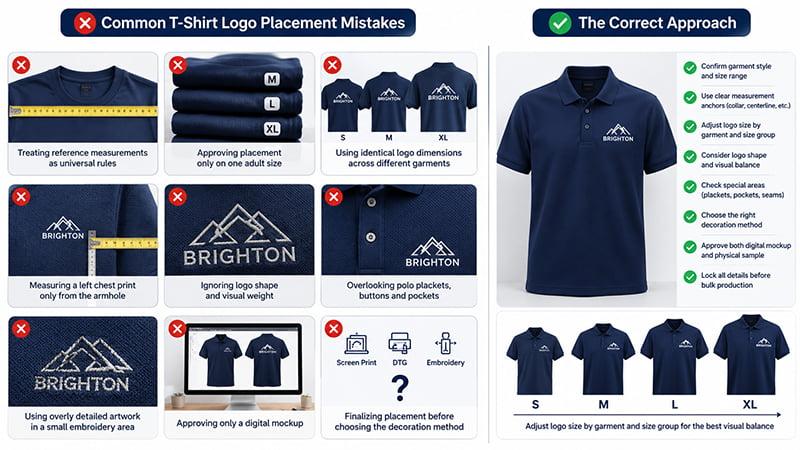
The most common problems include:
- treating reference measurements as universal rules;
- approving placement only on one adult size;
- using identical logo dimensions across different garments;
- measuring a left chest print only from the armhole;
- ignoring logo shape and visual weight;
- overlooking polo plackets, buttons and pockets;
- using overly detailed artwork in a small embroidery area;
- approving only a digital mockup;
- finalizing placement before choosing the decoration method.
Most placement problems do not come from one incorrect number. They appear when the garment, artwork, size run and production method are approved separately instead of as one complete specification.
Conclusion
A reliable logo placement guide should help buyers move from a visual idea to an approved production specification.
A placement chart provides a useful starting point, but it is not a universal rule. The final position should reflect the selected garment, logo shape, shirt size, decoration method and viewing purpose.
Clear placement instructions and representative sample approval help turn a digital design into a more consistent bulk order.
Send TOMAS Crafts your garment style, size breakdown, artwork, preferred decoration locations, order quantity and delivery date. Contact TOMAS Crafts to review practical placement options, branding methods and sample requirements before production.
FAQs
What Is the Standard Placement for a Left-Chest Logo?
A common adult starting point is about 3–4 inches below the collar area, with the logo measuring approximately 3–4 inches wide. The final position should be balanced against the collar, shoulder, sleeve and any chest pocket. Wide wordmarks and compact badges may require different dimensions on the same shirt.
How Far Below the Collar Should a Full Back Design Start?
Many adult full-back designs begin about 3–4 inches below the rear collar. A small back-neck logo or upper-back staff mark will sit differently, so the same measurement should not be used for every back print. Artwork height, shoulder width, hair coverage and garment length should also be checked.
Where Should a Logo Be Placed on a Polo Shirt?
A polo logo is commonly placed on the left chest and balanced between the placket and armhole. If the shirt has a pocket, the logo may sit on the pocket, above it or on the opposite chest. The final position should account for buttons, stitching, logo width and the selected decoration method.
Should the Same Logo Size Be Used on Every Shirt Size?
One fixed logo size may work across a limited adult range, especially for small left chest branding. Youth shirts, fitted cuts, oversized garments and extended sizes may require grouped artwork sizes or separate review before production.