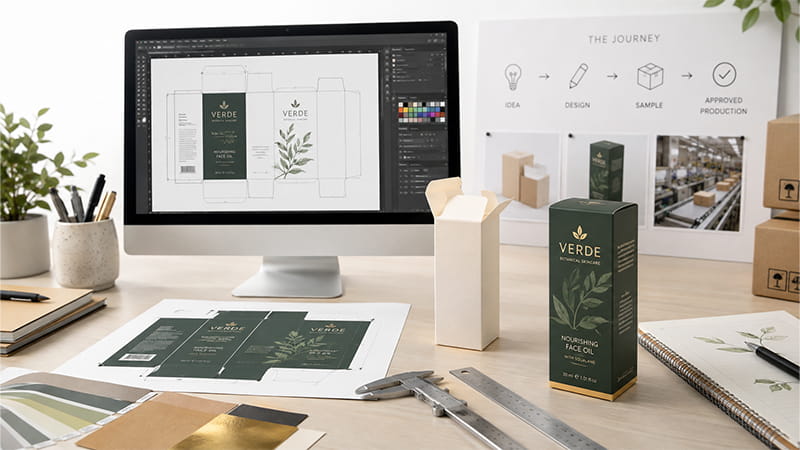
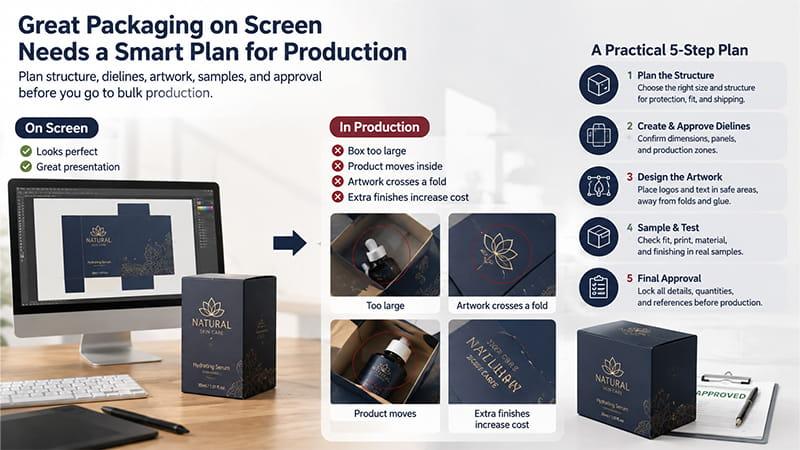
A packaging design can look polished on screen and still fail in production. The box may be too large. The product may move inside, artwork may cross a fold, or extra finishes may increase cost. This guide shows small businesses how to plan packaging structure, dielines, artwork, samples, and final approval before bulk production.
What Is Product Packaging Design?
Product packaging design covers both the physical package and its visual design. It also includes product information, usability, protection, and production requirements.
A good package should protect the product and explain what it is. It should also support the brand identity, suit the sales channel, and remain practical to manufacture.
For a small business, the right package should fit the product, customer, budget, order quantity, and distribution method. Extra complexity should solve a real packaging problem.
Start With the Product, Customer, and Sales Channel
Before choosing colors, fonts, finishes, or illustrations, define what the package needs to do.
Product Size, Weight, and Fragility
Start with the physical product. Record its final dimensions, weight, and shape. Then note fragile areas, accessories, instructions, and any other components that must fit inside.
Next, decide whether the package needs an insert, divider, or other internal support.
A lightweight notebook and a glass cosmetic container can have similar exterior dimensions. However, they need very different packaging. Weight, breakage risk, presentation, and transport conditions all affect the structure.
Avoid using one universal clearance rule between the product and the package. The right amount of space depends on the product shape, insert, material thickness, assembly method, and required protection.
For a new custom structure, test the final fit with a physical sample. Dimensions alone do not show how all parts will behave after assembly.
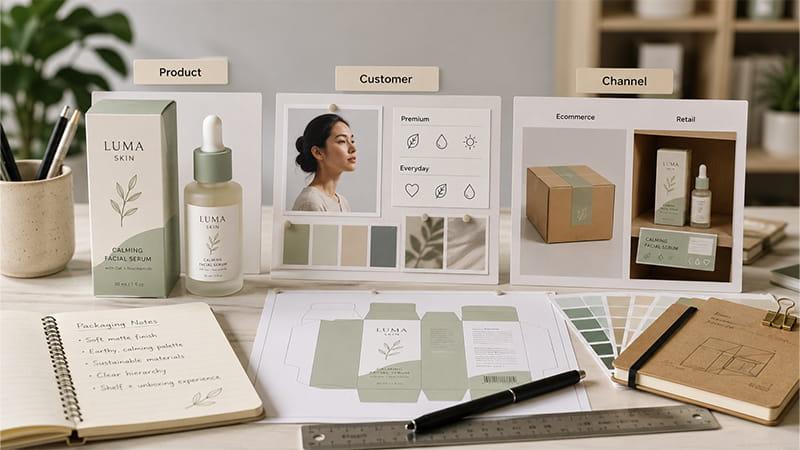
Who Is Buying the Product?
The target customer affects more than visual style.
Consider the expected price position and brand tone. Also think about readability, how much information buyers need, and what they expect when opening the package.
A practical everyday product may need direct communication and easy access. Premium packaging often places more focus on material feel, typography, finishing, and the opening experience.
Visual trends can provide inspiration. The final package should still match the product, price level, and customer expectations.
Ecommerce, Retail, or Both?
The sales channel changes your packaging design priorities.
For ecommerce, shipping protection and space efficiency often matter most. The package should limit product movement and avoid unnecessary volume. It also needs to handle normal parcel delivery.
Retail packaging has a different role. It needs to communicate quickly on a shelf. It may also need to separate one SKU from another or fit a display system.
A retail package may therefore need an extra shipping carton for ecommerce. In contrast, a strong shipping carton may protect the product well but communicate poorly on a retail shelf.
Decide early whether one package needs to handle both jobs. In some cases, separate retail and shipping packaging is more practical.
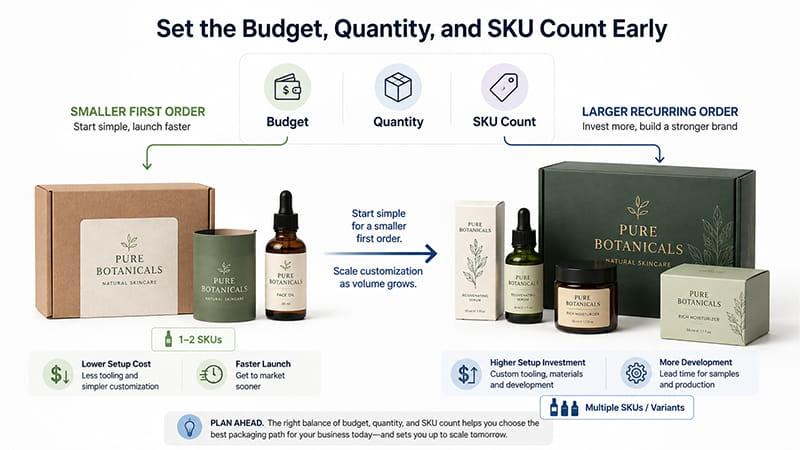
Set the Budget, Quantity, and SKU Count Early
Packaging choices affect cost before the first sample is made.
Confirm the target packaging cost, expected quantity, number of SKUs, and product variants. Also consider the reorder plan and whether several products can share one structure.
This is especially important for small businesses. A packaging concept that works for a large recurring order may create too much setup cost for a first launch.
For a smaller first order, an existing structure can be a better starting point. Custom printing, labels, sleeves, or inserts can still create a branded result without developing a completely new package.
Choose the Right Packaging Structure
The packaging type should follow the product requirements, not just the look of a reference image.
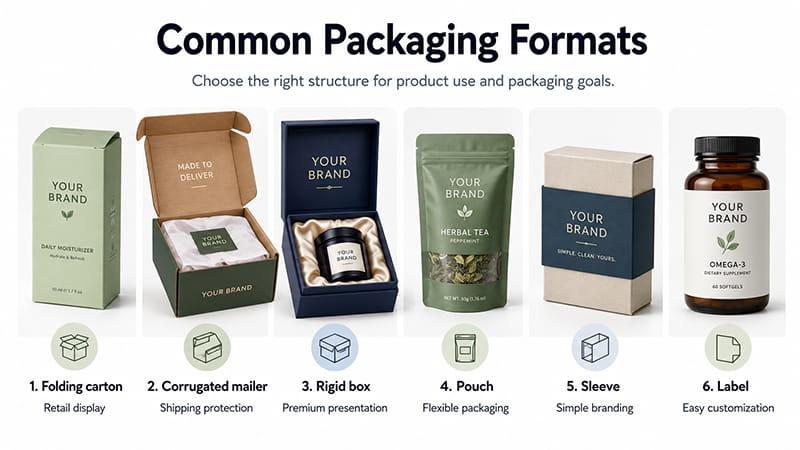
Common Packaging Formats and When to Use Them
| Packaging Format | Common Starting Use | Main Design Priority |
|---|---|---|
| Folding carton | Lightweight retail products | Shelf presentation and efficient structure |
| Corrugated mailer | Ecommerce products | Protection and shipping efficiency |
| Rigid box | Premium gifts and sets | Presentation and structural feel |
| Pouch | Flexible or lightweight products | Barrier, sealing, and print area |
| Sleeve | Existing boxes or containers | Simple branding layer |
| Label | Bottles, jars, or stock packaging | Flexible customization |
Folding cartons work well for many lightweight retail products. Examples include small accessories and some cosmetic products.
Corrugated mailers are more suitable when shipping protection and strength are the main priorities.
Rigid boxes are common for gifts, launches, and premium sets. They are useful when presentation is an important part of the customer experience.
A pouch, sleeve, or label can also be a practical starting point. A fully custom box is not necessary for every project. Simple formats can still create recognizable branded packaging.
Inserts and Inner Protection
Outer packaging solves only part of the problem.
An insert can control product movement, separate several items, and protect fragile areas. It can also improve presentation.
Common options include paper inserts, partitions, molded fiber, foam, and shaped holders.
Do not judge an insert only by how the package looks when it is open. Think about what happens when the box is tilted, stacked, carried, or shipped.
For gift sets, the insert also controls how each item stays in place. It affects how customers remove and discover the products.
If fit is important, test the insert with products that match the final production size. Small changes in product size or board thickness can affect the result. Wrapping material and insert construction can also change the fit.
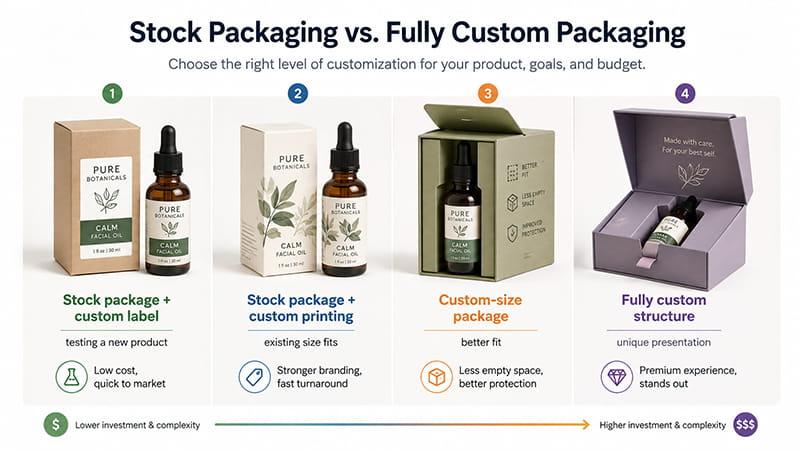
Stock Packaging vs. Fully Custom Packaging
Small businesses should decide how much customization the project really needs.
| Approach | Best When | Main Tradeoff |
|---|---|---|
| Stock package + custom label | Testing a new product | Limited structural branding |
| Stock package + custom printing | Existing sizes already fit | Less structural flexibility |
| Custom-size package | Product fit matters | More setup and sampling |
| Fully custom structure | Protection or presentation is unique | More development work |
A business testing a new product may be better served by stock packaging with a strong label, sleeve, or printed insert.
A custom-size package becomes more useful when better fit can reduce empty space or improve protection.
A fully custom structure makes sense when the product needs a special shape, opening method, insert system, or presentation.
Custom packaging is not better simply because more parts are customized. Each extra element should solve a clear problem in fit, protection, branding, presentation, or distribution.
Choose Materials Before Finalizing the Artwork
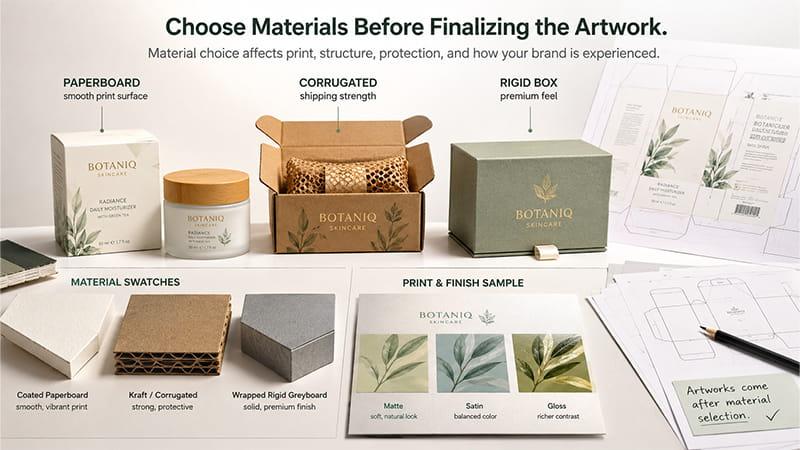
Packaging materials affect strength, appearance, finishing, weight, and cost. Choose the material before the visual design is fully locked.
Match Packaging Materials to the Product and Use Case
Paperboard is common for lightweight retail cartons. It also provides a relatively smooth surface for printed graphics.
Corrugated board offers more strength and transit protection. Wrapped greyboard and other rigid constructions are common in gift boxes and presentation packaging.
These are starting points, not fixed rules.
The final material grade and thickness should match the box size, product weight, structure, printing method, finishing, and shipping conditions.
Material choice also affects printed color and surface appearance. Paper color, texture, coating, and absorbency can change the result.
For a wider comparison of decoration methods, see TOMAS Crafts’ guide to printing methods.
Consider Sustainability Without Compromising Protection
Sustainable packaging starts with practical design choices.
Reduce unnecessary layers where possible. Avoid oversized boxes and consider recyclable structures when they suit the project. Several SKUs may also be able to share one box structure.
Coatings, laminations, inserts, adhesives, and mixed materials can affect recycling or disposal. Consider these details while choosing the structure and material.
Protection still matters. Using less material is not useful if the product arrives damaged and needs replacement.
Avoid broad claims such as “100% eco-friendly” unless the material and construction support them. Disposal options and supplier documentation should also support the claim.
Plan the Packaging Information and Visual Design
Once the physical direction is clear, decide what the package needs to say and how it should look.
Front Panel Hierarchy
A useful starting hierarchy is:
- Brand
- Product name
- Product type or primary benefit
- Variant or important differentiator
Not every element needs the same visual weight.
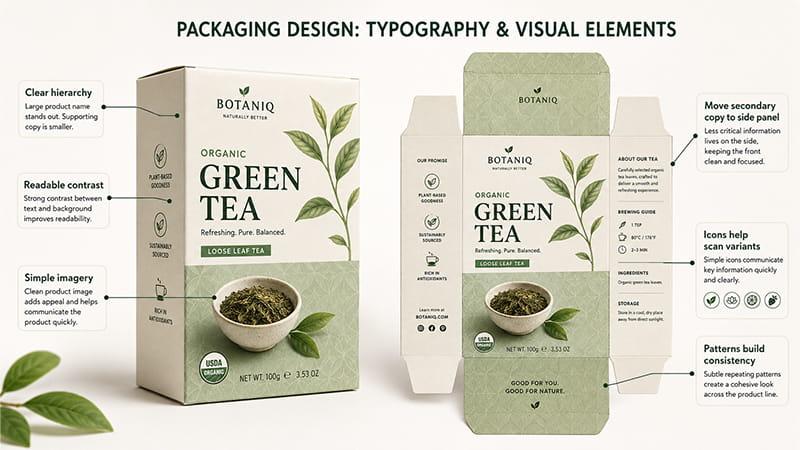
A crowded front panel makes the product harder to understand. The logo, product name, benefits, QR code, icons, and artwork should not all compete for attention.
Show the most important information first.
Side and Back Panels
Use secondary panels for information that does not need to lead the design.
This may include instructions, specifications, company details, QR codes, barcodes, or additional brand information.
Moving these details away from the front can make the main panel easier to read.
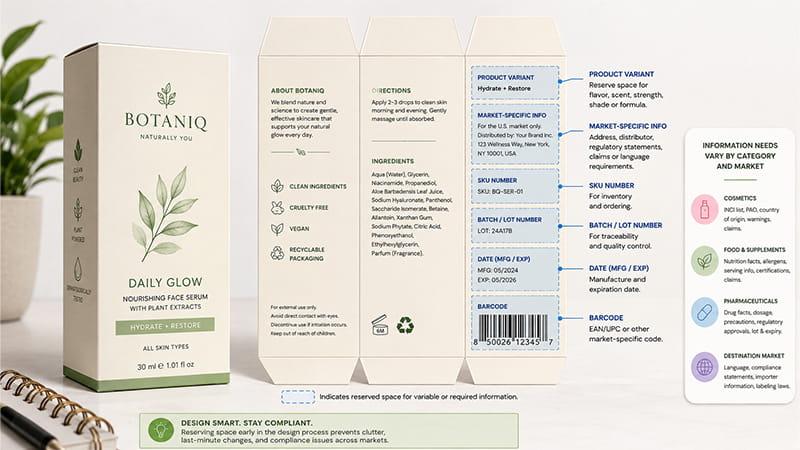
Reserve Space for Required and Variable Information
Plan variable information before the design becomes crowded.
This may include barcodes, SKU numbers, batch information, dates, product variants, or market-specific details.
Businesses that use standardized product identification should check the relevant GS1 barcode standards.
Other required information depends on the product category and destination market. Food, cosmetics, pharmaceuticals, and other regulated products can have different rules.
Confirm those requirements before approving the final artwork.
Logo Placement
Choose the main viewing panel and decide how strongly the logo should lead the design.
Check its position against folds, opening flaps, glue areas, and cut edges.
A logo may look centered on a flat artwork file but appear off-center after the box is assembled.
Always review the three-dimensional package, not just the flat file.
Color and Print References
Screen color and printed color are not the same.
RGB is mainly used for screens. Print production may use CMYK, spot colors, or another setup.
A Pantone color reference can help designers, brands, and manufacturers communicate important colors.
However, the same reference can look different on different materials.
Paper color, texture, coating, ink, and printing method all affect the final result. A logo printed on white coated board may look different on kraft stock.
Typography
Typography should make the package easier to understand.
Check text hierarchy, contrast, density, and available panel space. Also limit the number of fonts when possible.
Do not shrink every message simply to make it fit.
A better solution may be to shorten the copy. You can also move less important information to another panel.
There is no single minimum font size that works for every package. Readability depends on the typeface, material, printing process, viewing conditions, and any legal requirements.
Images, Illustrations, and Patterns
Use graphics when they help customers identify or understand the product.
Photography can show the product itself. Illustrations can explain use or support a distinctive identity.
Icons can help buyers scan variants. Patterns can create consistency across a product range.
Current packaging design trends can provide inspiration. Product fit, customer needs, and production requirements should still guide the final design.
Get the Manufacturer’s Dieline Before Finalizing the Artwork
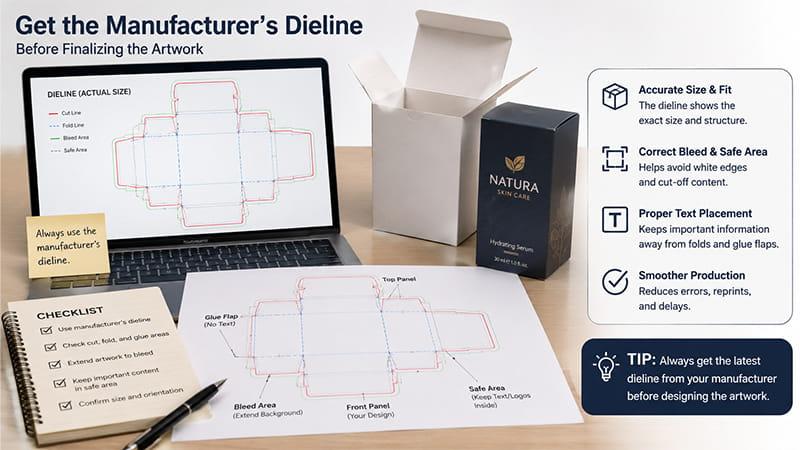
A dieline connects the visual design with the physical package.
It is the flat structural template used to place artwork around panels, folds, flaps, and cut areas.
What a Dieline Shows
A dieline may show:
- cut lines;
- fold or crease lines;
- panels and flaps;
- glue areas;
- bleed;
- safe areas.
The exact setup depends on the supplier and structure.
Do not assume that one supplier’s line colors, layer names, bleed values, or safe areas apply to another supplier.
Use the manufacturer-approved production dieline for final artwork.
An online template can help during early concept development. It should not be treated as a production file unless the manufacturer approves it.
How a Flat Dieline Becomes a 3D Package
A flat dieline can be hard to read because panel positions change after folding.
A top flap may look upside down on the artwork file but become correct after assembly. Graphics on two panels may only align when the package is folded.
Opening direction also matters. The panel that looks most important on the flat file may not be the first panel the customer sees.
Review the dieline together with a 3D mockup or blank structural sample. This makes the final panel positions easier to understand.
This is where graphic design and structural packaging design meet.
What to Check on Every Panel
Before approval, check:
- artwork orientation;
- logo position;
- important text;
- folds and cut areas;
- glue zones;
- barcode placement;
- opening direction;
- graphics that continue across panels.
Bleed and safe areas should follow the final production file.
Adobe’s guide to preparing Illustrator documents for print covers bleed, output, color management, and other print settings.
Choose Printing, Finishing, and Control Packaging Cost
Printing and finishing affect both appearance and cost.
Printing Options
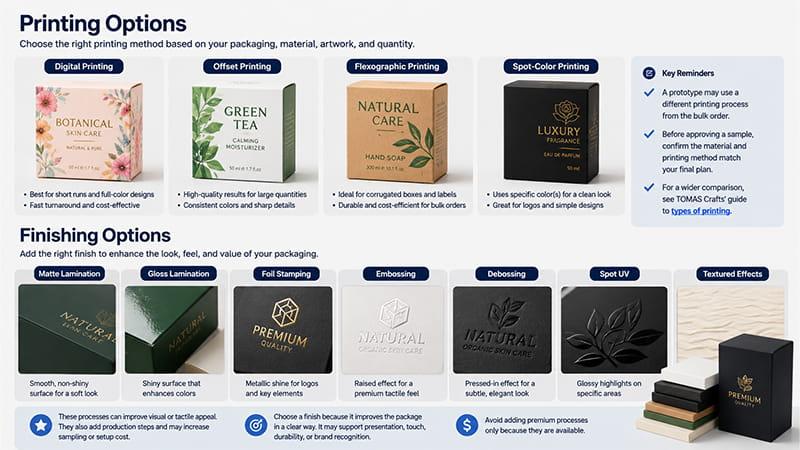
Common packaging printing methods include digital, offset, flexographic, and spot-color printing.
The right process depends on the packaging format, material, artwork, quantity, and color requirements.
A prototype may use a different printing process from the bulk order.
Before approving a sample as the final reference, confirm whether it uses the intended material and printing method.
For a wider comparison, see TOMAS Crafts’ guide to types of printing.
Finishing Options
Common finishing options include:
- matte or gloss lamination;
- foil stamping;
- embossing;
- debossing;
- spot UV;
- textured effects.
These processes can improve visual or tactile appeal. They also add production steps and may increase sampling or setup cost.
Choose a finish because it improves the package in a clear way. It may support presentation, touch, durability, or brand recognition.
Avoid adding premium processes only because they are available.
How Design Choices Affect Cost and MOQ
Packaging decisions are also purchasing decisions.
| Design Choice | What It May Affect |
|---|---|
| Custom structure | Dieline, tooling, and sampling |
| Material upgrade | Unit cost, rigidity, and print result |
| Extra print colors | Setup and production complexity |
| Foil or embossing | Additional production process |
| Custom insert | Material, tooling, and assembly |
| Multiple SKUs | Artwork versions and production handling |
| Assembled packaging | Labor and freight volume |
| Flat-packed packaging | Assembly requirements at destination |
A custom insert affects more than the insert material. It may also change tooling, sampling, assembly, packing, and carton volume.
Multiple SKUs add another cost consideration.
Several variants may share the same box structure. Different printing, labels, sleeves, barcodes, or inserts can then separate the SKUs.
Ask the supplier to compare this approach with producing a separate box for every variant.
The best option depends on the quantity per SKU, printing setup, dimensions, and product differences.
Discuss MOQ after the main structure, material, artwork versions, and finishes are clear.
Different parts of one project may have different minimums. The box, insert, printing process, and finishing can each have their own production requirements.
When requesting a quotation, provide both the total quantity and the quantity per SKU.
For example, 3,000 identical boxes are different from 3,000 boxes split across six artwork versions. The total quantity is the same, but the production setup is not.
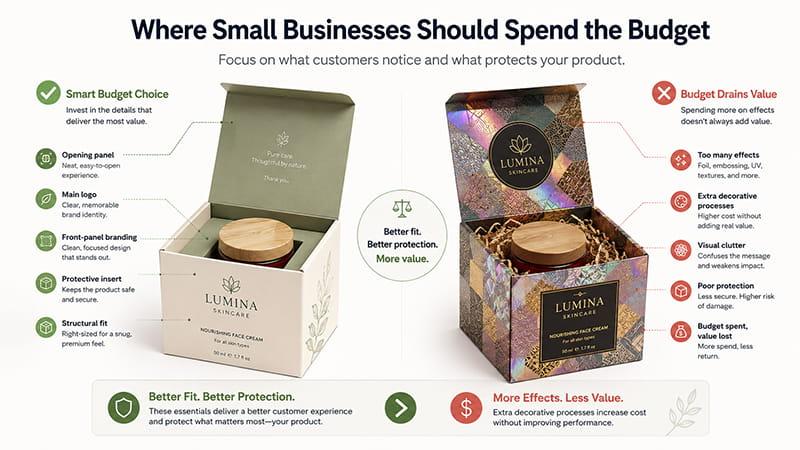
Where Small Businesses Should Spend the Budget
Spend more where customers are most likely to notice the difference or where the package needs better performance.
This may be the front-panel branding, main logo, opening panel, protective insert, or structural fit.
A clear package with one well-chosen premium finish can look stronger than a design that uses several effects without a clear purpose.
For many small businesses, better fit and better protection are more valuable than adding another decorative process.
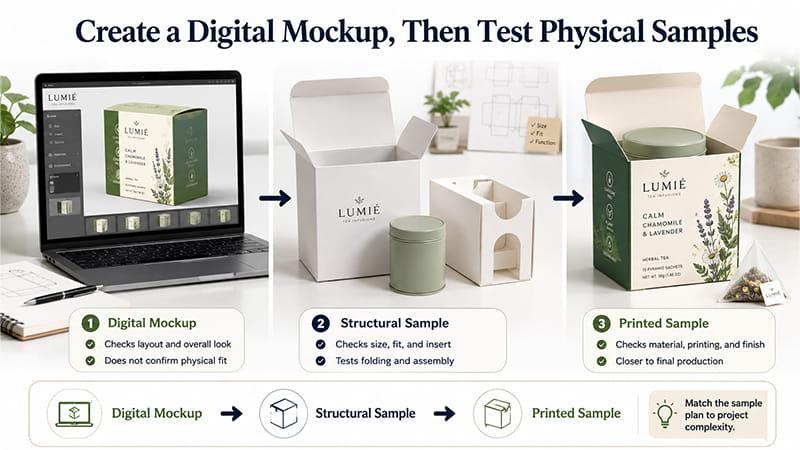
Create a Digital Mockup, Then Test Physical Samples
A digital rendering is useful, but it cannot answer every production question.
What a Digital Mockup Can Confirm
A digital mockup helps you review:
- visual hierarchy;
- logo size;
- artwork orientation;
- panel relationships;
- the overall assembled appearance.
It is also useful when several people need to approve the creative direction.
However, a digital mockup cannot confirm physical product fit. It also cannot fully show material texture, rigidity, closure, insert performance, or final print quality.
What a Structural Sample Can Confirm
A structural sample checks the physical package.
Use it to review:
- dimensions;
- product fit;
- flap closure;
- insert fit;
- assembly;
- product movement;
- opening sequence.
This stage is especially useful for a new box size or insert.
Solving structural problems before adding complex printing can prevent a costly second printed sample.
For example, a box may match the approved dimensions on paper but still feel too tight after assembly.
Board thickness, wrapping material, tolerances, and the insert all take up space. A blank structural sample can reveal these problems before final printing begins.
What a Printed Pre-Production Sample Can Confirm
A printed pre-production sample brings the approval closer to the bulk product.
Use it to review the material, artwork, printing, color direction, finishing, insert presentation, and overall opening experience.
A useful approval sequence is:
Digital Mockup → Structural Sample → Printed Sample
Not every project needs all three stages.
A stock box with a simple label may need little sampling. A rigid gift box with a custom insert, foil stamping, and several SKUs has more risk and usually needs more checking.
Match the sample plan to the project complexity and the cost of getting something wrong in bulk production.
Prepare the Packaging Files and Production Specifications
Once the structure, artwork, and sample direction are clear, prepare a clean production handoff.
Final Artwork and Prepress Check
A practical prepress review should cover:
- approved dieline;
- final artwork version;
- vector logos;
- suitable image resolution;
- font treatment;
- print color references;
- supplier-specific bleed;
- finishing layers;
- barcodes or QR codes;
- SKU names;
- quantity by SKU.
If the supplier needs fonts converted to vector shapes, Adobe explains how to convert text to outlines.
Keep an editable master file. Outlined text can no longer be edited like normal text.
Control Artwork Versions Across SKUs
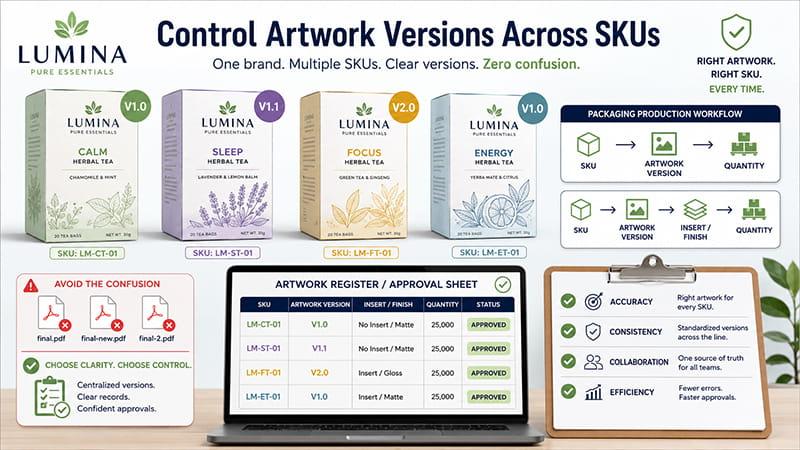
Version control becomes more important as the number of SKUs grows.
A simple production reference should connect:
SKU → Artwork Version → Quantity
If inserts or finishes also change, use:
SKU → Artwork Version → Insert / Finish → Quantity
Do not rely only on filenames such as final.pdf, final-new.pdf, and final-2.pdf.
Those names become confusing when several people review the project.
Use a clear artwork register or final approval sheet instead. Both the buyer and supplier should be able to identify the correct production file for every SKU.
TOMAS Packaging Design Specification Sheet
Artwork is only one part of the production handoff.
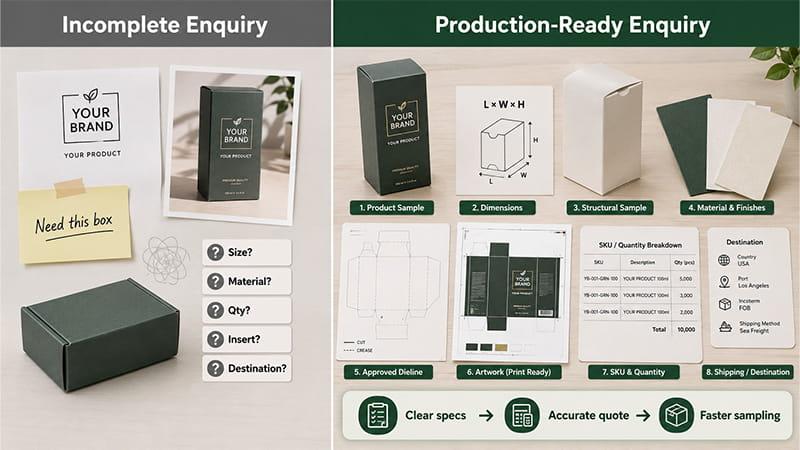
The supplier also needs the physical product details, production requirements, purchasing information, and delivery target.
For a custom packaging enquiry, confirm as many of these details as possible:
| Specification | What the Buyer Should Confirm |
|---|---|
| Product dimensions | Final L × W × H |
| Product weight | Product and packed weight |
| Packaging format | Box, pouch, sleeve, label, etc. |
| Structure | Stock or custom |
| Material | Final substrate |
| Insert | Type and material |
| Dieline | Approved version |
| Artwork | Final version |
| Printing | Colors and process |
| Finishing | Lamination, foil, embossing, etc. |
| Quantity | Total and SKU breakdown |
| Sample | Structural / printed |
| Packing | Flat-packed or assembled |
| Destination | Country / warehouse |
| Required date | Delivery target |
A supplier can review a project more accurately when these details are clear.
Sending only a logo and reference image leaves too many open questions. It also makes quotation comparisons less reliable.
Some details may still be undecided at the enquiry stage. Mark them as open decisions instead of guessing.
The supplier can then compare practical options. For example, you may need to choose between a stock or custom box, a paper or foam insert, or simple printing and an added finishing process.
For buyers sourcing products together with their packaging, TOMAS Crafts custom promotional products shows how product selection, branding, packaging, sampling, and production can be managed within one project.
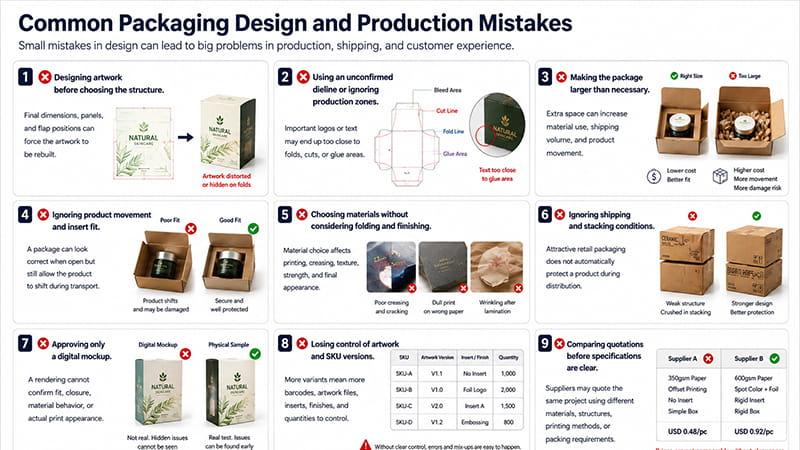
Common Packaging Design and Production Mistakes
Even a strong visual concept can create problems when production needs are considered too late.
Designing artwork before choosing the structure.
Final dimensions, panels, and flap positions can force the artwork to be rebuilt.
Using an unconfirmed dieline or ignoring production zones.
A generic template may not match the supplier’s structure. Important logos or text may also end up too close to folds, cuts, or glue areas.
Making the package larger than necessary.
Extra space can increase material use, shipping volume, and product movement.
Ignoring product movement and insert fit.
A package can look correct when open but still allow the product to shift during transport.
Choosing materials without considering folding and finishing.
Material choice affects printing, creasing, texture, strength, and final appearance.
Ignoring shipping and stacking conditions.
Attractive retail packaging does not automatically protect a product during distribution.
Approving only a digital mockup.
A rendering cannot confirm fit, closure, material behavior, or actual print appearance.
Losing control of artwork and SKU versions.
More variants mean more barcodes, artwork files, inserts, finishes, and quantities to control.
Comparing quotations before specifications are clear.
Two suppliers may appear to quote the same project while using different materials, structures, printing methods, or packing requirements.
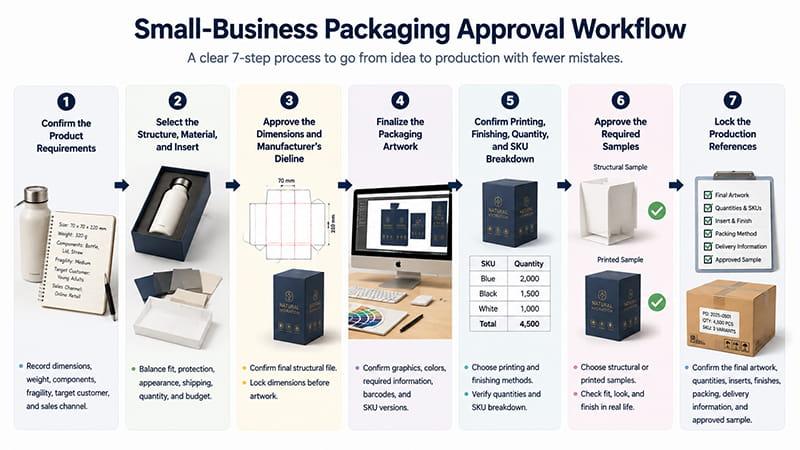
Small-Business Packaging Approval Workflow
The full process can be summarized in seven steps.
Step 1: Confirm the product requirements.
Record the dimensions, weight, components, fragility, target customer, and sales channel.
Step 2: Select the structure, material, and insert.
Balance fit, protection, appearance, shipping, quantity, and budget.
Step 3: Approve the dimensions and manufacturer’s dieline.
Use the final structural file before locking the production artwork.
Step 4: Finalize the packaging artwork.
Confirm graphics, colors, required information, barcodes, and SKU versions.
Step 5: Confirm printing, finishing, quantity, and SKU breakdown.
Make sure the production methods suit the material, budget, and order size.
Step 6: Approve the required samples.
Choose structural or printed samples based on project risk and complexity.
Step 7: Lock the production references.
Confirm the final artwork, quantities, inserts, finishes, packing, delivery information, and approved sample.
For multi-SKU projects, the final approval record should clearly show what belongs to each version.
Both the buyer and supplier should be able to match the correct structure, artwork, insert, finish, and quantity before bulk production begins.
Conclusion
Good packaging design connects brand communication, product protection, customer experience, production, and cost control.
Small businesses do not need the most complicated package.
They need a solution that fits the product and sales channel. The structure, material, printing, sampling, and order quantity should also make sense for the project.
A simpler package that moves smoothly into production can be more useful than an elaborate concept that needs repeated changes or becomes difficult to reorder.
Need Help With a Custom Packaging Project?
If you are preparing a custom packaging project, contact TOMAS Crafts with your product dimensions, target quantity, artwork, preferred packaging style, SKU breakdown, and destination market.
We can help review the structure, inserts, printing methods, finishing, sampling, and production setup before bulk production.
Some specifications may still be undecided. In that case, we can compare practical options based on your product, quantity, budget, and delivery requirements.
FAQs
How Do I Design Packaging for My Product?
Start with the physical product and intended sales channel. Then follow this order:
Product → Structure → Material → Information → Dieline → Artwork → Printing → Sample → Production
This process keeps the visual design connected to protection, production, budget, and customer needs.
What Is a Dieline in Packaging Design?
A dieline is the flat structural template for a package.
It shows the panels, cuts, folds, flaps, glue areas, bleed, and other production references needed to build the finished package.
Use the manufacturer-approved dieline for final artwork.
Generic online templates are useful for early concepts. However, they may not match the supplier’s actual production structure.
How Much Does Custom Packaging Cost and What Affects MOQ?
There is no single price or MOQ for custom packaging.
Cost and minimum quantity depend on the structure, dimensions, materials, printing, finishing, inserts, setup, total quantity, and number of SKUs.
Sampling and packing method also affect the project.
For multi-SKU orders, provide both the total quantity and the quantity for each artwork version.
This helps the supplier review setup requirements and check whether several SKUs can share one package structure.
Should I Order a Physical Packaging Sample Before Bulk Production?
A physical sample is especially useful for a new structure, custom insert, unfamiliar material, premium finish, or product that needs a precise fit.
A structural sample checks dimensions, fit, closure, inserts, folding, and assembly.
A printed pre-production sample checks the material, artwork, printing, color direction, finishing, and final presentation.
The two samples solve different problems. Choose the sample plan based on the risk and complexity of the project.