
Tape measures look simple, but many people misread tiny ticks and end up with wrong cuts. This guide shows how to use a tape measure and read tape measure marks down to 1/16, apply hook compensation, and use quick methods like the case-length trick. You’ll also get a fraction-to-decimal table and short drills to measure faster with fewer rework errors.
Pro Tip 1: Set Up for Accurate Measuring Before Reading Any Marks
Before you focus on the lines, understand how your tape measure behaves. The hook and the way you hold tension can change results by a noticeable fraction.
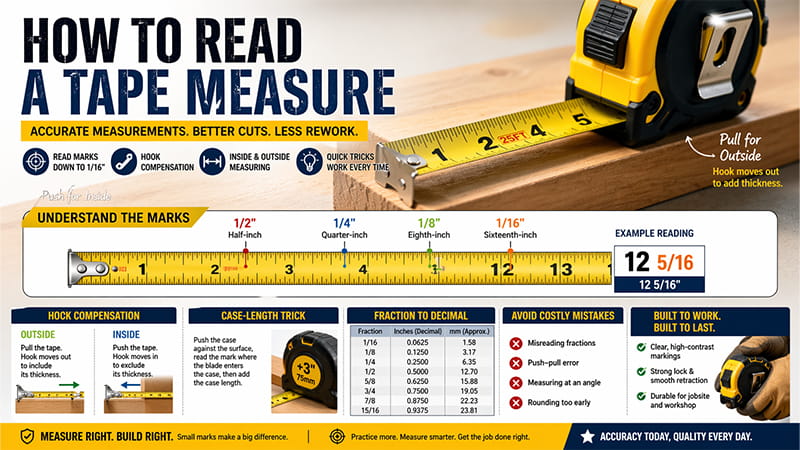
Use the Hook Correctly (Hook Compensation)
The metal hook at the end of your tape is designed to slide slightly. That movement compensates for the hook’s thickness.
- Outside measurements (pulling): the hook shifts out to include its thickness.
- Inside measurements (pushing): the hook shifts in to exclude its thickness.
Rule: Pull firmly for outside measurements, and push firmly for inside measurements so your “zero” stays accurate.
Keep Your Scale Consistent
Tape measures come in three formats: imperial, metric, and dual-scale. Switching units mid-project (or rounding early) introduces avoidable errors. If your cut list is in inches, stay in inches. If it’s metric, stay metric. For quick inch↔mm reference and standard unit definitions, use the NIST Unit Conversion reference.
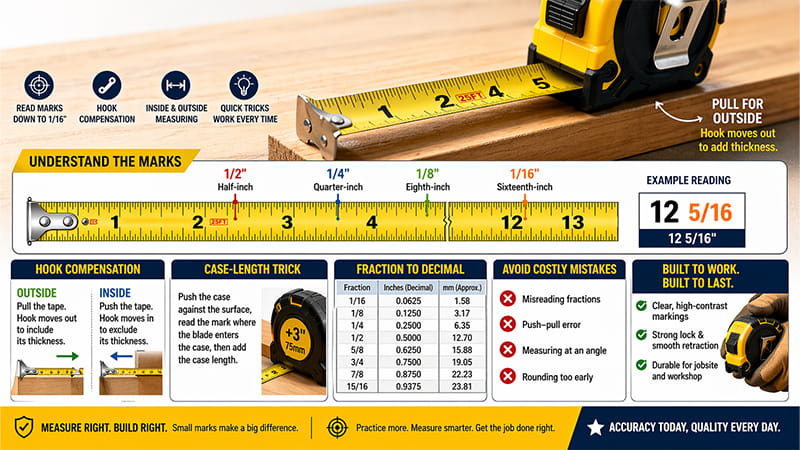
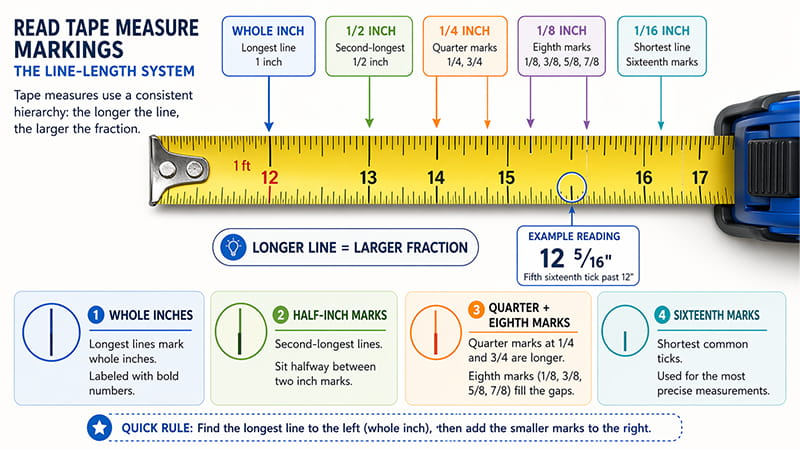
Pro Tip 2: Use the Line-Length System to Read Tape Measure Markings
Tape measures use a consistent hierarchy: the longer the line, the larger the fraction.
Visual guide
See the labeled diagram below for 1/2, 1/4, 1/8, and 1/16 ticks, plus one sample reading (for example, 12 5/16).
Suggested ALT (choose 1):
- Tape measure markings diagram showing 1/2, 1/4, 1/8, and 1/16 increments
- How to read tape measure marks with labeled fractions and a 12 5/16 example
Whole Inches
The longest lines mark whole inches and are labeled with bold numbers. Many tapes highlight every 12 inches (1 foot).
Half-Inch Marks
On imperial tapes, half-inch marks are the second-longest lines and sit halfway between two inch marks.
Quarter + Eighth-Inch Marks
Quarter and three-quarter marks appear at 1/4 and 3/4. Eighth marks fill the gaps: 1/8, 3/8, 5/8, 7/8.
Quick rule: if the half-inch line is the “peak,” quarters are the “shoulders,” and eighths are shorter ticks in between.
Sixteenth-Inch Marks
Sixteenth marks are the smallest common increments and matter most in fine work. You don’t need to memorize every tick—use the hierarchy rule to identify the fraction.
Pro Tip 3: Use a Fraction Cheat Sheet to Read Full Tape Measure Marks Faster
Even experienced teams use quick references to reduce mental-math errors on cut lists.
Metric values are approximate.
| Fraction | Decimal (inches) | Metric (mm approx.) |
|---|---|---|
| 1/16 | 0.0625 | 1.58 |
| 1/8 | 0.125 | 3.17 |
| 3/16 | 0.1875 | 4.76 |
| 1/4 | 0.25 | 6.35 |
| 5/16 | 0.3125 | 7.93 |
| 3/8 | 0.375 | 9.52 |
| 7/16 | 0.4375 | 11.11 |
| 1/2 | 0.5 | 12.7 |
| 9/16 | 0.5625 | 14.28 |
| 5/8 | 0.625 | 15.87 |
| 11/16 | 0.6875 | 17.46 |
| 3/4 | 0.75 | 19.05 |
| 13/16 | 0.8125 | 20.63 |
| 7/8 | 0.875 | 22.22 |
| 15/16 | 0.9375 | 23.81 |
Say-It-Out-Loud Method
Once you read a measurement, say it out loud (example: “twelve and five-eighths”). This reduces transposed fractions like mixing up 3/8 and 5/8.
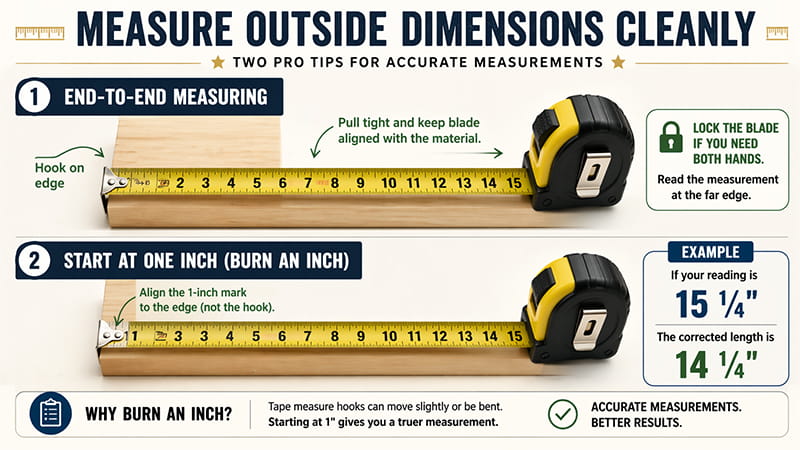
Pro Tip 4: Measure Outside Dimensions Cleanly
End-to-End Measuring
Hook the tape over one edge, pull tight, and keep the blade aligned with the material. Lock the blade to prevent slip if you need both hands.
Start at One Inch (Burn an Inch)
If the hook is bent or questionable, align the 1-inch mark to the edge instead of the hook. Measure, then subtract exactly 1 inch.
Example: If you read 15 1/4 inches, the corrected length is 14 1/4 inches.
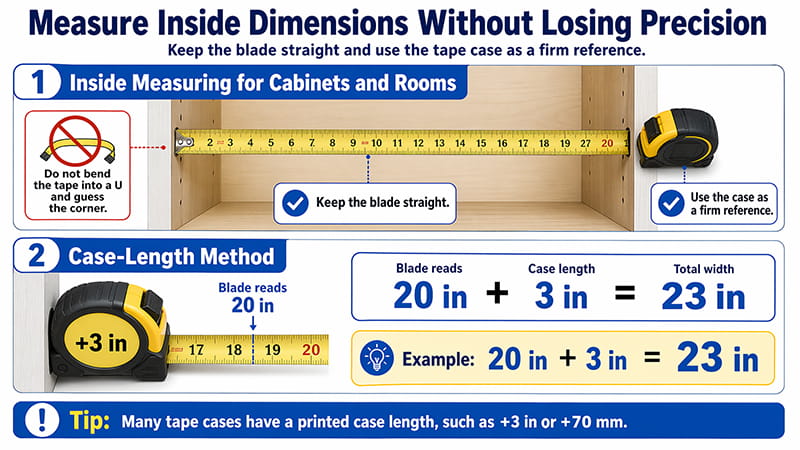
Pro Tip 5: Measure Inside Dimensions Without Losing Precision
Inside Measuring for Cabinets and Rooms
Don’t bend the tape into a “U” and guess the corner. Keep the blade straight and use the case as a firm reference.
Case-Length Method
Many tape cases have a printed length (e.g., +3 inches or +70 mm). Push the case against one side, read where the blade enters the case, then add the printed case length.
Example: Blade reads 20 inches, case is 3 inches → total width 23 inches.
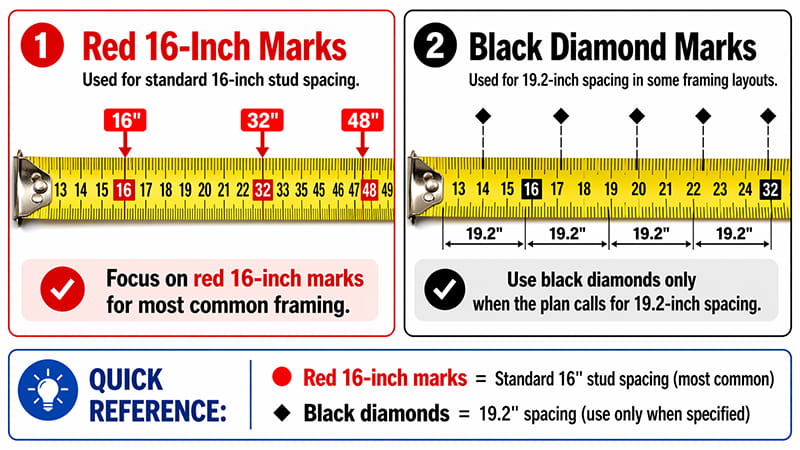
Pro Tip 6: Read Special Marks Without Overthinking Them
Red 16-Inch Marks
Many tapes highlight every 16 inches for standard stud spacing in North American framing.
Black Diamond Marks
Black diamonds often indicate 19.2-inch spacing (five equal spaces across 8 feet). This appears in some engineered framing layouts where 16-inch spacing isn’t used. If your plan/spec calls for 19.2-inch spacing, use black diamonds; otherwise focus on 16-inch marks. For the official definition, see STANLEY’s explanation of black diamond marks.
Pro Tip 7: Avoid the Mistakes That Cause Wrong Cuts
- Misreading fractions: Use the line hierarchy (eighths are longer than sixteenths).
- Push–pull error: Pull for outside, push for inside, so the hook compensates correctly.
- Measuring at an angle: Angles add length and cause consistent over-measurement.
- Rounding too early: Keep exact fractions until you cut.
Quick Practice (3 Drills)
Drill 1: Locate 7 3/8 inches. Tip: count three eighth marks after 7 inches.
Drill 2: Read 12 5/16 inches. Tip: it’s one tick past 1/4 (4/16).
Drill 3: Convert 5/8 inches → 0.625 inches.
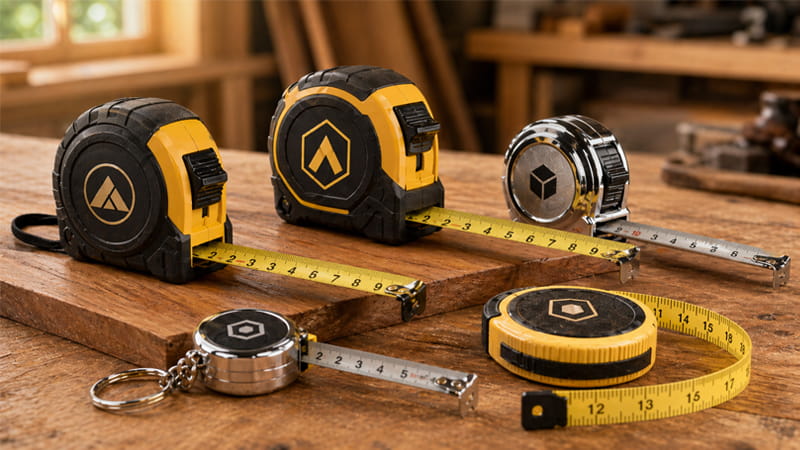
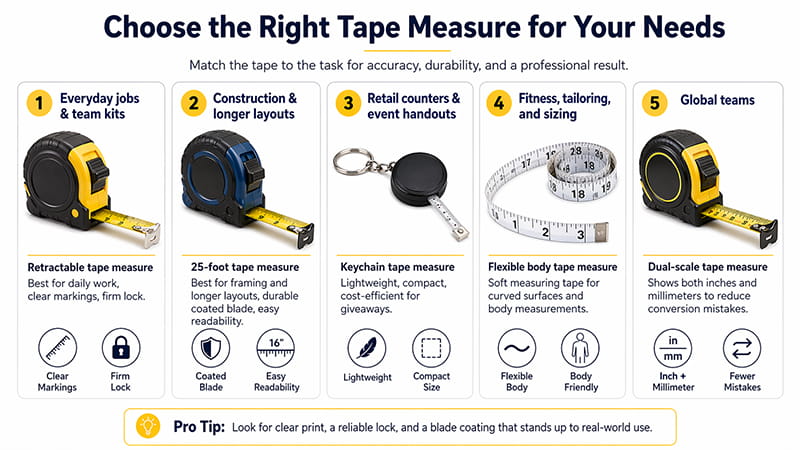
Choosing the Right Tape Measure for Work, Teams, and Giveaways
If you’re selecting tapes for a team or giveaway program, prioritize readability and durability.
Which tape measure best fits your needs?
If you’re choosing a tape for daily work or branded giveaways, start with the use case—then match the specs so it stays readable and reliable after months of use.
- Everyday jobs & team kits: Choose a retractable tape measure with a firm locking mechanism. Look for clear high-contrast markings and a smooth retraction spring so users can measure one-handed without slipping.
- Construction & longer layouts: A 25-foot tape is the most versatile. If your audience works in framing, consider tapes with 16-inch marks and a blade coating that resists fading.
- Retail counters & event handouts: Keychain tape measures are lightweight and cost-efficient for high-volume distribution. Prioritize simple markings and durable logo placement so the branding stays legible.
- Fitness, tailoring, and sizing: A flexible body tape measure is more accurate than a rigid blade for curved surfaces and body measurements.
- Global teams: A dual-scale tape (inch + mm) reduces conversion mistakes when projects mix unit systems.
For branded programs, specs matter as much as the design: blade coating, lock feel, and print placement determine whether the tape looks “premium” or “cheap” after real-world use.
Readability Features That Matter
- High-contrast markings (black on yellow/white)
- Fraction labels (helpful for training)
Durability Features That Protect Markings
- Nylon/Mylar coated blade to reduce fading
- Sturdy housing to protect the spring
- Reliable blade lock to prevent slippage
Match Tape Styles to Real Use Cases
- Keychain tapes: quick retail checks, office use, small packages
- 16-foot tapes: indoor DIY and furniture projects
- 25-foot tapes: construction and framing work
Why custom tape measures work as promotional tools
A tape measure is a rare giveaway that stays in daily circulation—on job sites, in workshops, and in tool drawers—so it earns repeated impressions without feeling like advertising. For bulk programs, small spec choices make a big difference: clear high-contrast markings, a reliable lock, and a coated blade that resists fading. Keep the logo readable and durable so it still looks clean after months of use.

Conclusion
Once you understand the line hierarchy and treat the hook as a precision component, tape measure marks become much easier to read. With a fraction table and a few drills, most people improve speed and accuracy quickly.
Use hook compensation, the case-length method, and consistent units to reduce wrong cuts and rework across real projects.
Call To Action
Planning bulk tape measures for a team, retail program, or event giveaway? Confirm specs early to avoid delays and mismatched scales.
TOMAS Crafts can recommend the right tape type (imperial/metric/dual-scale), durability options (coated blade, lock style), and logo placement that stays legible over time.
To quote fast, send: quantity, preferred scale, logo file, timeline, and delivery destination (country/ZIP). You can learn more about TOMAS Crafts here, or contact us here to get a fast quote. If you’re browsing office-ready categories first, start with Office Supplies.
FAQs
1) How do I read tape measure marks in 1/16 increments without guessing?
Find the nearest larger mark first (inch → 1/2 → 1/4). Then count the shortest ticks (sixteenths) to the exact point.
2) Why does the tape measure hook move, and how do I measure accurately with it?
It moves to account for hook thickness. Pull for outside measurements and push for inside measurements so your zero stays accurate.
3) When do the red 16-inch marks and black diamond marks actually matter?
Red marks support standard 16-inch stud layout. Black diamonds indicate 19.2-inch spacing used in some engineered framing layouts.
4) How can I keep markings on a tape measure visible and accurate over time?
Don’t let the blade snap back at full speed. Wipe the blade clean after dusty/wet use, store it dry, and avoid impacts that bend the hook.

