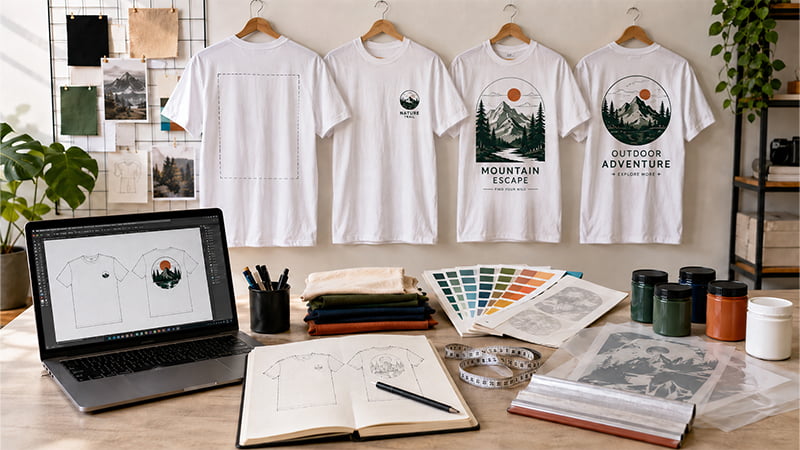
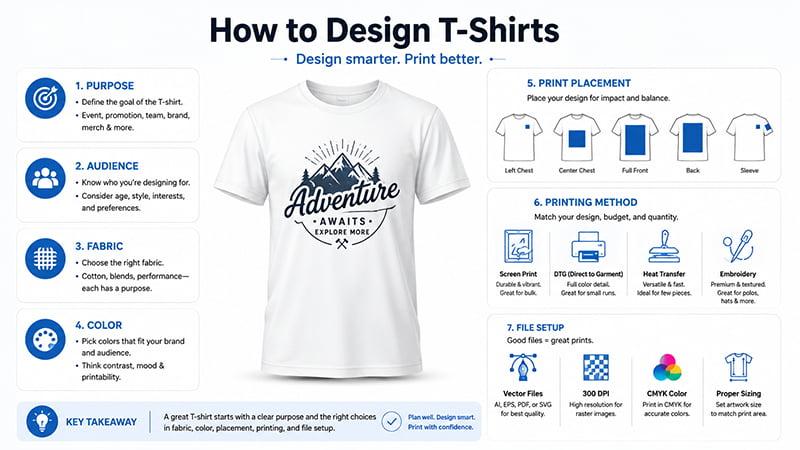
Learning how to design T-shirts is not only about making a nice graphic. A good design must match the purpose, audience, fabric, color, print placement, printing method, and file setup. This guide helps beginners, brands, HR teams, event buyers, and procurement teams create T-shirt designs that look good and print correctly.
What Makes a Good T-Shirt Design?
A good T-shirt design starts with a clear purpose. A company event shirt, employee uniform, sports team shirt, school club tee, campaign shirt, and retail merchandise design all need different decisions.
The design should fit the people who will actually wear it. A bold full-front graphic may work for a concert or campaign shirt. A small left-chest logo may work better for staff uniforms, polos, or corporate apparel. The best design is not always the loudest one. It is the one that fits the wearer, the setting, and the final use.
A strong design also needs to work on real fabric. Cotton, polyester, blended fabrics, dark shirts, light shirts, and different garment sizes can all affect the final look. Fabric texture, shirt color, print area, and decoration method can change how sharp, bright, or readable the design appears after production.
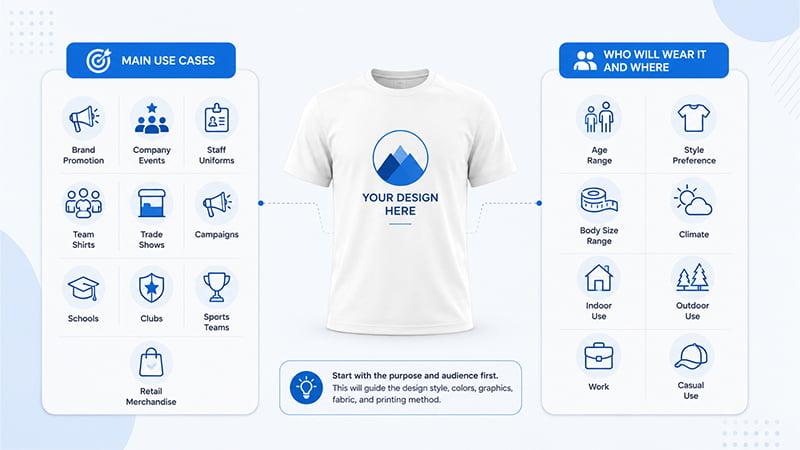
Step 1: Define the Goal and Audience
Before opening a T-shirt designer tool or choosing a template, define why the T-shirt is being made. This step will guide the artwork style, logo size, color choice, fabric, and printing method.
Choose the main use case
Start with the main purpose of the shirt. Common use cases include brand promotion, company events, employee uniforms, team shirts, trade shows, campaigns, schools, clubs, sports teams, and retail merchandise.
A staff uniform may need a subtle logo and clean brand colors. An event shirt may need a bold slogan, date, sponsor layout, or staff role on the back. A retail shirt needs stronger style appeal because people must want to wear it again.
This is also where many T-shirt design ideas become too crowded. If the shirt tries to show a logo, slogan, event date, QR code, sponsor list, and illustration all on the front, the final design may feel messy. Choose one main message first.
Decide who will wear it and where
Next, think about the wearer. Consider age range, gender mix, body size range, climate, work environment, and whether the shirt will be worn indoors, outdoors, at work, or casually.
A large company logo may work for event staff because people need to identify the team quickly. The same large logo may not work well for employee gifts or customer merchandise because people may not want to wear it after the event.
If you want to design your own T-shirt, start with the purpose before choosing colors or graphics. A design that looks good on a polished mockup may not match the actual audience. For example, a heavy black cotton shirt with a large print may not be comfortable for a summer outdoor event.
Step 2: Choose the Right T-Shirt Base
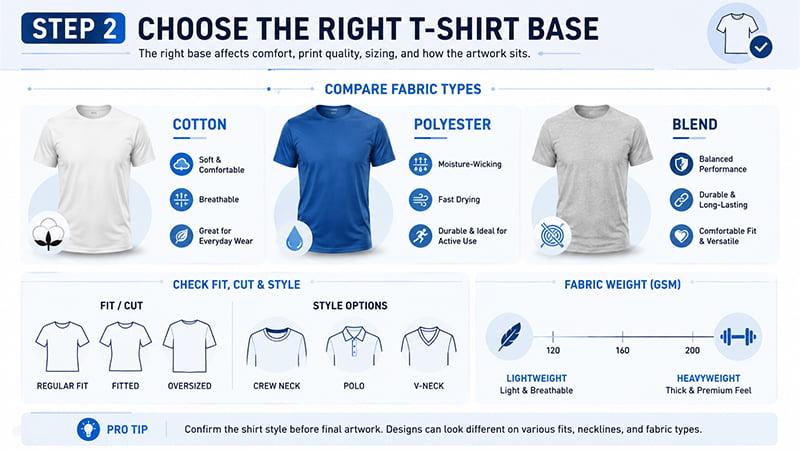
The shirt base affects comfort, print quality, sizing, and how the artwork sits on the garment. Do not finalize the design before choosing the base shirt.
Compare cotton, polyester, and blended fabrics
Cotton T-shirts are common for casual shirts, school events, brand giveaways, and simple prints. They feel soft and familiar, and they work well for many basic printing methods.
Polyester or performance T-shirts are better for sports teams, marathons, outdoor staff, summer campaigns, and high-sweat activities. They are lighter, faster drying, and more suitable for active use.
Cotton-poly blends offer a balance of comfort, durability, and stable fit. They are often a safe choice for everyday wear, employee shirts, and event apparel.
Fabric choice affects more than comfort. It can influence shrinkage risk, print method, ink behavior, hand feel, and final color. A design that works well on cotton may need adjustment for polyester.
Check fit, cut, GSM, and garment style
The shirt shape also matters. Unisex tees, fitted cuts, oversized shirts, V-necks, polos, lightweight event shirts, and heavyweight blanks do not carry artwork in the same way.
An oversized streetwear tee can handle a larger full-front graphic. A fitted shirt may need a smaller print so the design does not look stretched. A polo usually works better with embroidery or a small left-chest logo than a large front graphic.
Fabric weight is another detail. Lightweight shirts are useful for summer events or large giveaways, while heavyweight blanks can feel more premium for retail merchandise or brand kits. The right choice depends on budget, audience, climate, and expected use.
TOMAS Crafts sourcing note
For bulk custom T-shirts, confirm the shirt style before final artwork. A design that looks balanced on a regular crew neck may not look the same on oversized tees, polos, V-necks, or performance shirts.
At TOMAS Crafts, we usually recommend checking the shirt base, fabric weight, neckline, and fit before final placement approval. This prevents rework when the artwork looks good on one blank but feels unbalanced on another.
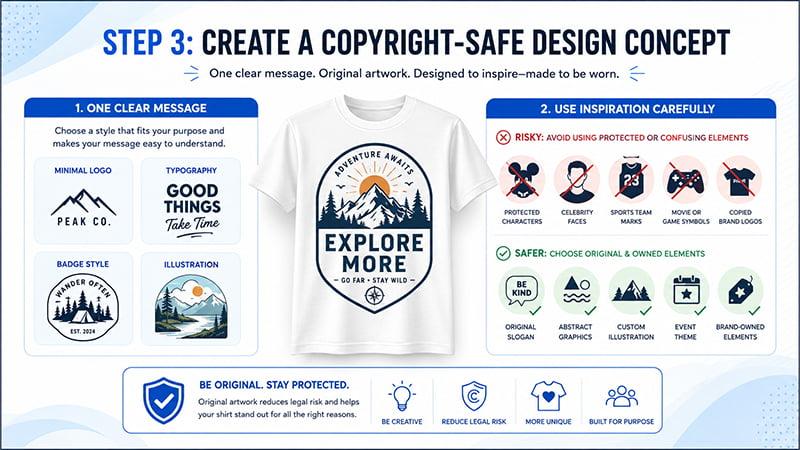
Step 3: Create a Copyright-Safe Design Concept
Once the purpose and shirt base are clear, start building the design concept. This is where you decide the message, style, layout, and visual direction.
Use one clear message and visual style
A great T-shirt design usually has one main idea. It may be a slogan, brand mark, event identity, team name, illustration, mascot, or badge-style design. The goal is to make the message easy to understand at a glance.
Most shirt designs fall into a few practical styles, such as a minimal logo, typography layout, badge-style graphic, illustration, mascot, slogan, full-front graphic, back print, staff role print, or sponsor layout.
If the shirt is for a corporate event, the design may need a logo, slogan, and event date. If it is for a school club or sports team, the design may focus on group identity. If it is for retail merchandise, the design should feel wearable and not too promotional.
Use inspiration carefully and avoid IP risks
Mood boards, fashion references, color trends, stock images, and pop culture themes can help you explore shirt designs. But the final artwork should be original.
Avoid using protected characters, celebrities, sports team marks, brand logos, movie or game elements, music artist names, and confusingly similar trademark designs without permission. This is especially important for schools, events, promotional buyers, and brands that need shirts for public use.
A copyright-safe shirt design can still feel creative. Use original slogans, abstract graphics, custom illustrations, event themes, safe icons, and brand-owned elements instead of copying existing artwork. This reduces legal risk and helps the design feel more unique.
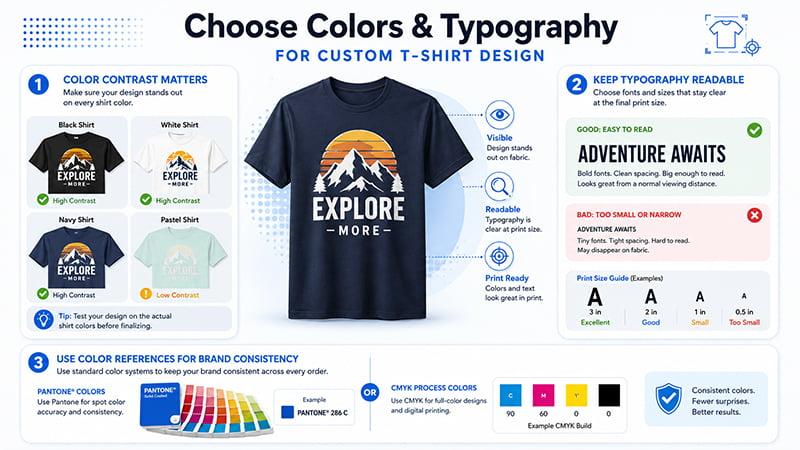
Step 4: Choose Colors and Typography
Color and type can make or break a custom T-shirt design. A layout may look clean on a screen, but fabric and print method can change the final result.
Make sure the design is visible on the shirt color
Shirt color affects print visibility. Black, white, navy, pastel, neon, red, and heather fabrics all behave differently.
A low-contrast design may look stylish in a mockup but unclear on fabric. For example, a navy design on a black shirt may look premium on screen but disappear in real use. A pale yellow print on a white shirt may also lose impact under indoor lighting.
Before finalizing colors, check the artwork on the actual shirt color. If the shirt will be produced in several colors, review each version. Some shirt designs need separate color adjustments for dark and light fabrics.
Keep fonts readable at real print size
Typography should stay readable at the final print size. Thin fonts, tiny text, and narrow spacing may look fine on a screen but break down on fabric.
Be extra careful with sleeve prints, small text, sponsor lists, back prints, labels, and event details. For most custom T-shirt design projects, use one or two fonts. Keep the main message large enough to read from a normal viewing distance.
Use color references for brand consistency
For brand projects, use Pantone, CMYK, or clear color values. The Pantone color system can help brands and suppliers communicate color more consistently across samples, bulk production, and repeat orders.
This does not mean every T-shirt project needs exact Pantone matching. But if a company logo or campaign color matters, clear color references reduce confusion. They also make it easier to compare samples and repeat the same design later.
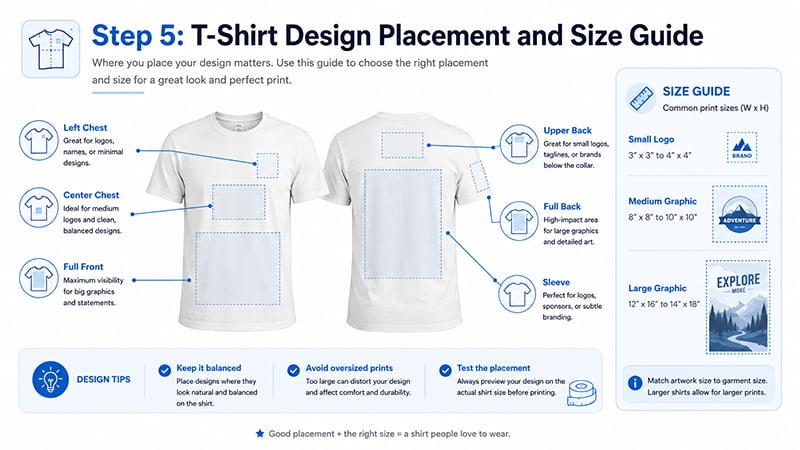
Step 5: T-Shirt Design Placement and Size Guide
Print placement has a big impact on the final look. A design can look good but still feel wrong if it is too high, too low, too wide, or too small for the garment.
Compare common print placements
| Placement | Best For | Design Tip |
|---|---|---|
| Left chest logo | Corporate shirts, polos, uniforms | Keep logo small and clean |
| Center chest | Slogans, simple graphics, event shirts | Check text readability |
| Full front print | Bold artwork, merchandise, campaign shirts | Test size across shirt sizes |
| Back print | Staff roles, sponsor lists, team names | Avoid tiny sponsor text |
| Sleeve print | Sponsor logos, department names, secondary marks | Keep artwork simple |
A left-chest logo is common for corporate shirts, polos, and uniforms. A center chest design works well for short slogans, clean graphics, and simple brand marks. A full front print creates more visual impact and is better for merchandise, campaign shirts, or event tees.
Back prints are useful for staff roles, sponsor lists, schedules, and team names. Sleeve prints are good for secondary logos, departments, sponsor marks, or event details. Keep sleeve artwork simple because the print area is smaller.
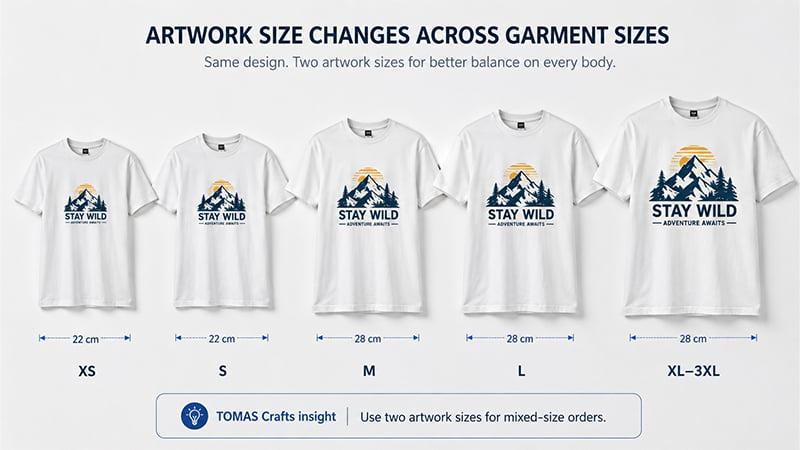
TOMAS Crafts information gain: artwork size changes across garment sizes
In bulk custom T-shirt orders, one standard artwork size does not always work across every garment size. For example, a 28 cm front print may look balanced on M or L, but it can feel too wide on XS and too small on 2XL or 3XL. This is especially common in event shirts, volunteer apparel, and staff uniforms where the size range is broad.
TOMAS Crafts usually checks the main size range before final placement approval. For mixed-size orders, we may recommend two artwork size versions instead of forcing one print size across every shirt. A smaller print can be used for XS–S, while a larger version can be used for M–3XL.
This is not a fixed rule for every order. It depends on the artwork, shirt style, print method, and size breakdown. But reviewing the main size range before production helps the design look more consistent across the full order and avoids awkward proportions in mass production.
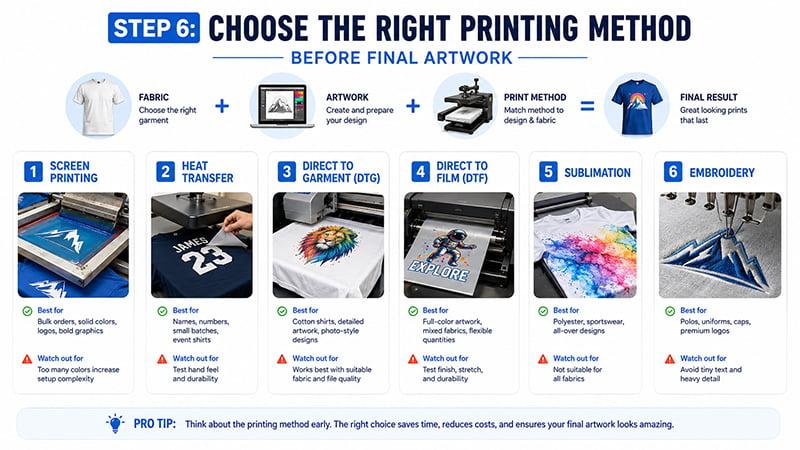
Step 6: Choose the Right Printing Method Before Final Artwork
Many people design the graphic first and choose the printing method later. That can lead to problems. The better approach is to think about printing while the design is still being built.
Compare common T-shirt printing methods
| Printing Method | Best For | Watch Out For |
|---|---|---|
| Screen printing | Bulk orders, solid colors, logos, bold graphics | Too many colors increase setup complexity |
| Heat transfer | Names, numbers, small batches, event shirts | Test hand feel and durability |
| Direct to garment | Cotton shirts, detailed artwork, photo-style designs | Works best with suitable fabric and file quality |
| Direct to film | Full-color artwork, mixed fabrics, flexible quantities | Test finish, stretch, and durability |
| Sublimation | Polyester, sportswear, all-over designs | Not suitable for all fabrics |
| Embroidery | Polos, uniforms, caps, premium logos | Avoid tiny text and heavy detail |
Screen printing works well for bulk orders, bold graphics, and simple color designs. It is a strong choice for event shirts, brand promotions, and large team orders.
Heat transfer is useful for names, numbers, small batches, and multi-color event shirts. Direct to garment is better for detailed artwork, soft gradients, and photo-style graphics on suitable cotton shirts. Direct to film is flexible for full-color artwork and mixed fabrics. Sublimation works best on polyester and sportswear. Embroidery is ideal for premium logos on polos, uniforms, and caps, but it is not the best choice for tiny text or highly detailed artwork.
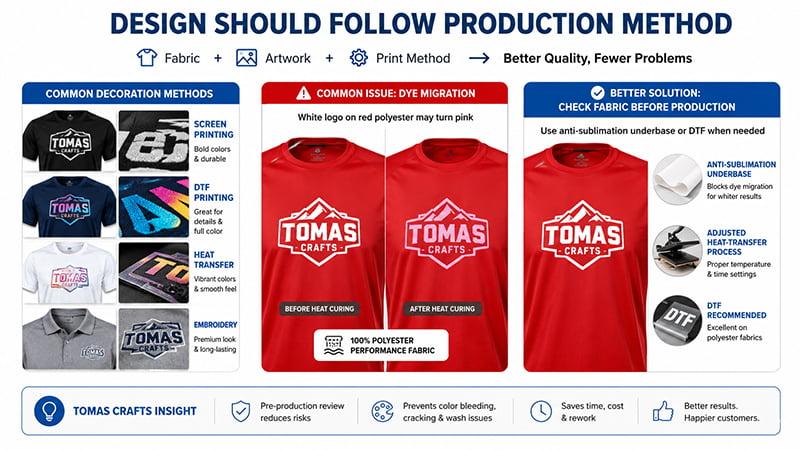
TOMAS Crafts information gain: design should follow production method
Some T-shirt print problems happen because the design is approved before the fabric and decoration method are confirmed. Tiny text, thin outlines, gradients, photo graphics, large solid blocks, and embroidery logos all need different setup decisions.
A common issue is dye migration on bright or dark polyester shirts. For example, when a white logo is printed on red 100% polyester, the red dye can bleed into the white ink during heat curing. The final logo may turn pink instead of staying clean white.
For this type of performance fabric, TOMAS Crafts usually reviews the fabric content, ink type, curing temperature, and print method before production. If needed, we may add an anti-sublimation underbase, adjust the heat-transfer process, or recommend DTF instead of standard screen printing.
This step helps reduce color bleeding, cracking, poor wash durability, and other common quality issues in bulk custom T-shirt orders. It also reduces the chance of redesigning the artwork after the buyer has already approved the digital file.
Before you print T-shirts in bulk, check the artwork size, shirt color, fabric content, and decoration method together. That review is often more useful than fixing problems after production starts.
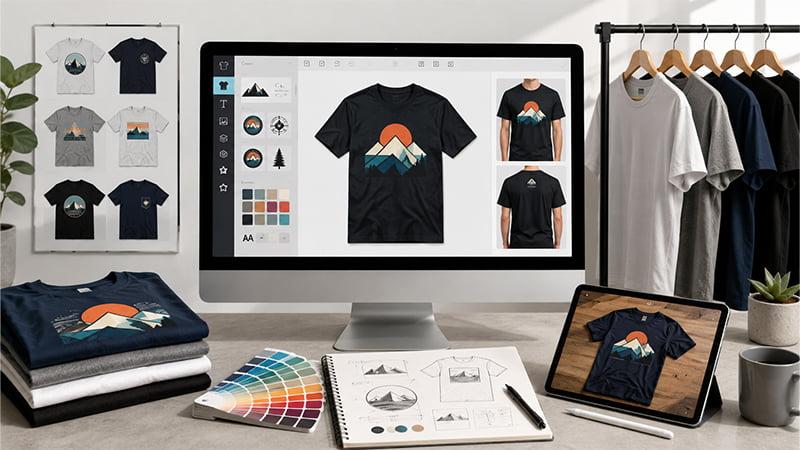
Step 7: Use a T-Shirt Designer, Templates, and Mockups Carefully
Online design tools can be useful, especially for beginners. They help users test layout, upload designs, drag and drop elements, choose fonts, and preview shirt designs quickly.
Online T-shirt designer tools help with layout, not production checks
A T-shirt design template or quick design tool can help with early layout. It can also help a small business or event planner see whether the design style matches the brand.
But a design tool mockup is not always a production file. Template exports may need cleanup. File resolution must be checked. Fonts, colors, and image quality still matter. If the design uses uploaded photos, stock images, or detailed graphics, the final file should be reviewed before printing.
Online tools can help you create quick shirt designs, but the final file still needs production review. This is especially true if you plan to print T-shirts for company events, uniforms, trade shows, sports teams, or retail merchandise.
Mockups are useful, but they are not physical samples
A mockup generator is useful for layout preview, internal approval, product listings, customer feedback, and comparing shirt colors. It can help the buyer see the final look before ordering prints.
But a mockup cannot confirm fabric feel, print texture, actual color, stretch, wash performance, or the final print size on real garments.
This difference matters for bulk custom T-shirt production. A polished mockup may look perfect, but the real shirt still needs sample approval. For larger orders, a physical sample is the safer way to confirm print position, hand feel, color, and overall quality.
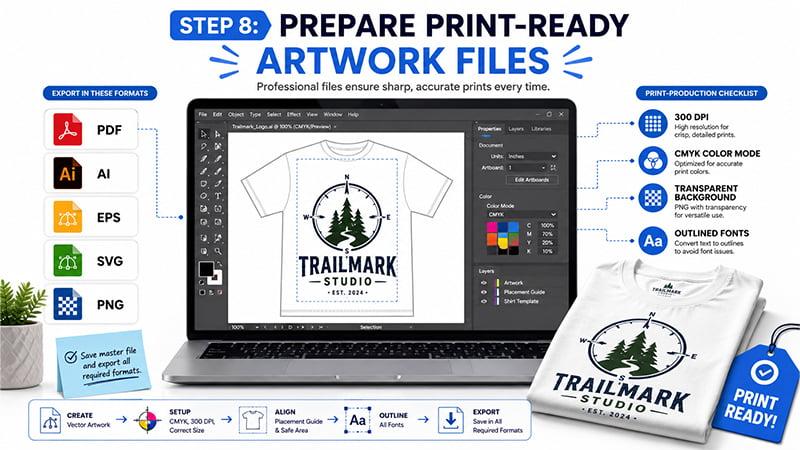
Step 8: Prepare Print-Ready Artwork Files
A good design still needs the right file setup. Poor files can create blurry prints, missing fonts, color shifts, and production delays.
Use vector and high-resolution files
For logos, text, and clean graphics, vector files are usually the safest choice. Adobe explains that vector graphics are built with mathematical formulas, while raster images are pixel-based. This is why vector artwork can scale more cleanly than low-resolution pixel images.
Common file types include:
- AI
- EPS
- SVG
- editable PDF
- high-resolution PNG
- transparent PNG when needed
- 300 DPI artwork at actual print size for raster images
Avoid screenshots, low-resolution JPGs, compressed images, and blurry PNGs. These files may look acceptable on a phone screen but fail at full print size.
Set colors, outline fonts, and prepare simple versions
Before sending artwork to production, prepare clear color references. Use Pantone, CMYK, or approved brand color values when needed.
Convert fonts to outlines or paths so the factory does not lose the font when opening the file. Prepare transparent background files when needed. Separate the files for front, back, sleeve, and label positions if the design uses multiple print areas.
It also helps to prepare simplified versions. A one-color logo version can be useful for screen printing, embroidery, heat transfer, and budget control. A simplified embroidery version may need thicker lines and fewer small details than the original digital logo.
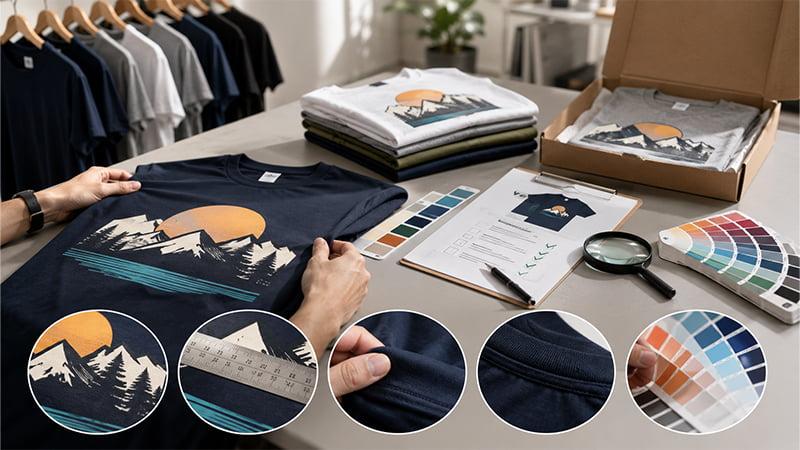
Step 9: Review Samples Before Bulk Production
A final mockup is useful, but it should not be the last approval step for a serious custom T-shirt project. The sample stage helps catch problems before mass production.
Check the design at real print size
Do not approve only the enlarged artwork file. Review the actual print size on the garment.
Check the front position, back position, sleeve position, label position, distance from the collar, and balance across garment sizes. If the order includes multiple shirt colors, review how the design looks on each color.
This is also the right time to check small text, fine lines, large solid print areas, and any design that crosses seams or curves around the body.
Approve a physical sample before mass production
A physical sample is especially important for bulk orders, multiple shirt sizes, embroidery, detailed artwork, dark shirts, performance fabrics, and tight event deadlines.
Sample approval helps catch color, placement, fabric, and decoration issues before bulk production. It can also help the buyer compare the final look with the original design idea.
For event planners, schools, sports teams, and corporate buyers, this step can prevent costly rework. It is better to adjust one sample than to fix hundreds or thousands of finished shirts.
If the design is for a T-shirt business, test a small batch before scaling. This helps confirm fit, print quality, customer feedback, and final production details before increasing order volume.
Common T-Shirt Design Mistakes to Avoid
- Using low-resolution files: This can cause blurry prints and rough edges.
- Making the design too large: Oversized designs may look awkward on smaller shirts.
- Using too many colors: This can increase setup complexity and cost.
- Ignoring fabric type: Cotton, polyester, and blends may need different methods.
- Using tiny text: Small text often disappears on fabric.
- Choosing the print method too late: Artwork may need redesign.
- Relying only on a mockup: Mockups do not show real fabric, ink, texture, or wash performance.
- Skipping sample approval: This is risky for bulk custom T-shirt projects.
- Copying copyrighted designs: This can create legal and platform compliance problems.
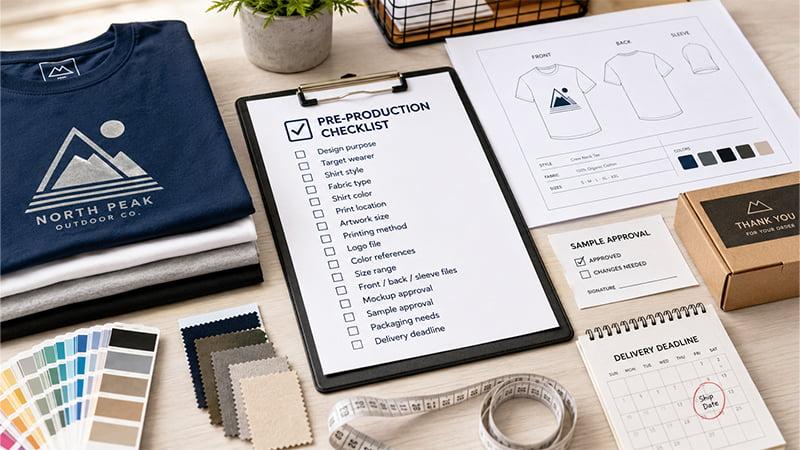
T-Shirt Design Checklist Before Production
Before sending your final artwork into production, check these details:
- design purpose
- target wearer
- shirt style
- fabric type
- shirt color
- print location
- artwork size
- printing method
- logo file
- color references
- size range
- front, back, and sleeve files
- mockup approval
- sample approval
- packaging needs
- delivery deadline
This checklist is simple, but it helps prevent many common production problems. It also gives your supplier the information needed to quote, sample, and produce the order more accurately.
Conclusion
Designing a T-shirt is not only about making a good-looking graphic. A successful shirt design needs the right purpose, audience, shirt base, fabric, color, print placement, printing method, artwork file, mockup review, and sample approval.
If you are designing custom T-shirts for company events, employee uniforms, trade shows, campaigns, schools, sports teams, or branded merchandise, TOMAS Crafts can help with artwork review, product sourcing, logo methods, sampling, packaging, and bulk production.
Share your design idea, quantity, shirt type, deadline, and preferred decoration method, and our team can suggest a practical production plan. You can also contact TOMAS Crafts to discuss your custom T-shirt project.
FAQs
How do I design a T-shirt from scratch?
Start with the purpose, audience, shirt style, and print location. Then create a simple concept, choose colors, prepare print-ready artwork, review a mockup, and approve a sample before bulk production.
What file format is best for T-shirt design?
Vector files such as AI, EPS, SVG, or editable PDF are best for logos, text, and clean graphics. High-resolution PNG files can work for some full-color artwork, but screenshots and low-resolution JPGs should be avoided.
What size should a T-shirt design be?
It depends on the print location, shirt size, and design style. Left-chest, center-chest, full-front, back, and sleeve prints all need different sizes. Always check the artwork on a mockup and sample before production.
Which printing method is best for custom T-shirts?
Screen printing is good for bulk orders with simple colors. DTG and DTF are better for full-color artwork. Heat transfer works for names, numbers, and event shirts. Embroidery works best for premium logos on polos, uniforms, and caps.
